Adventures in Visibility Rendering
- Part 1: Visibility Buffer Rendering with Material Graphs
- Part 2: Decoupled Visibility Multisampling
- Part 3: Software VRS with Visibility Buffer Rendering
- Part 4: Visibility TAA and Upsampling with Subsample History
This is the 4th post in the series, and you should definitely read Part 2: Decoupled Visibility Multisampling before going further as this technique is an extension of DVM.
Introduction
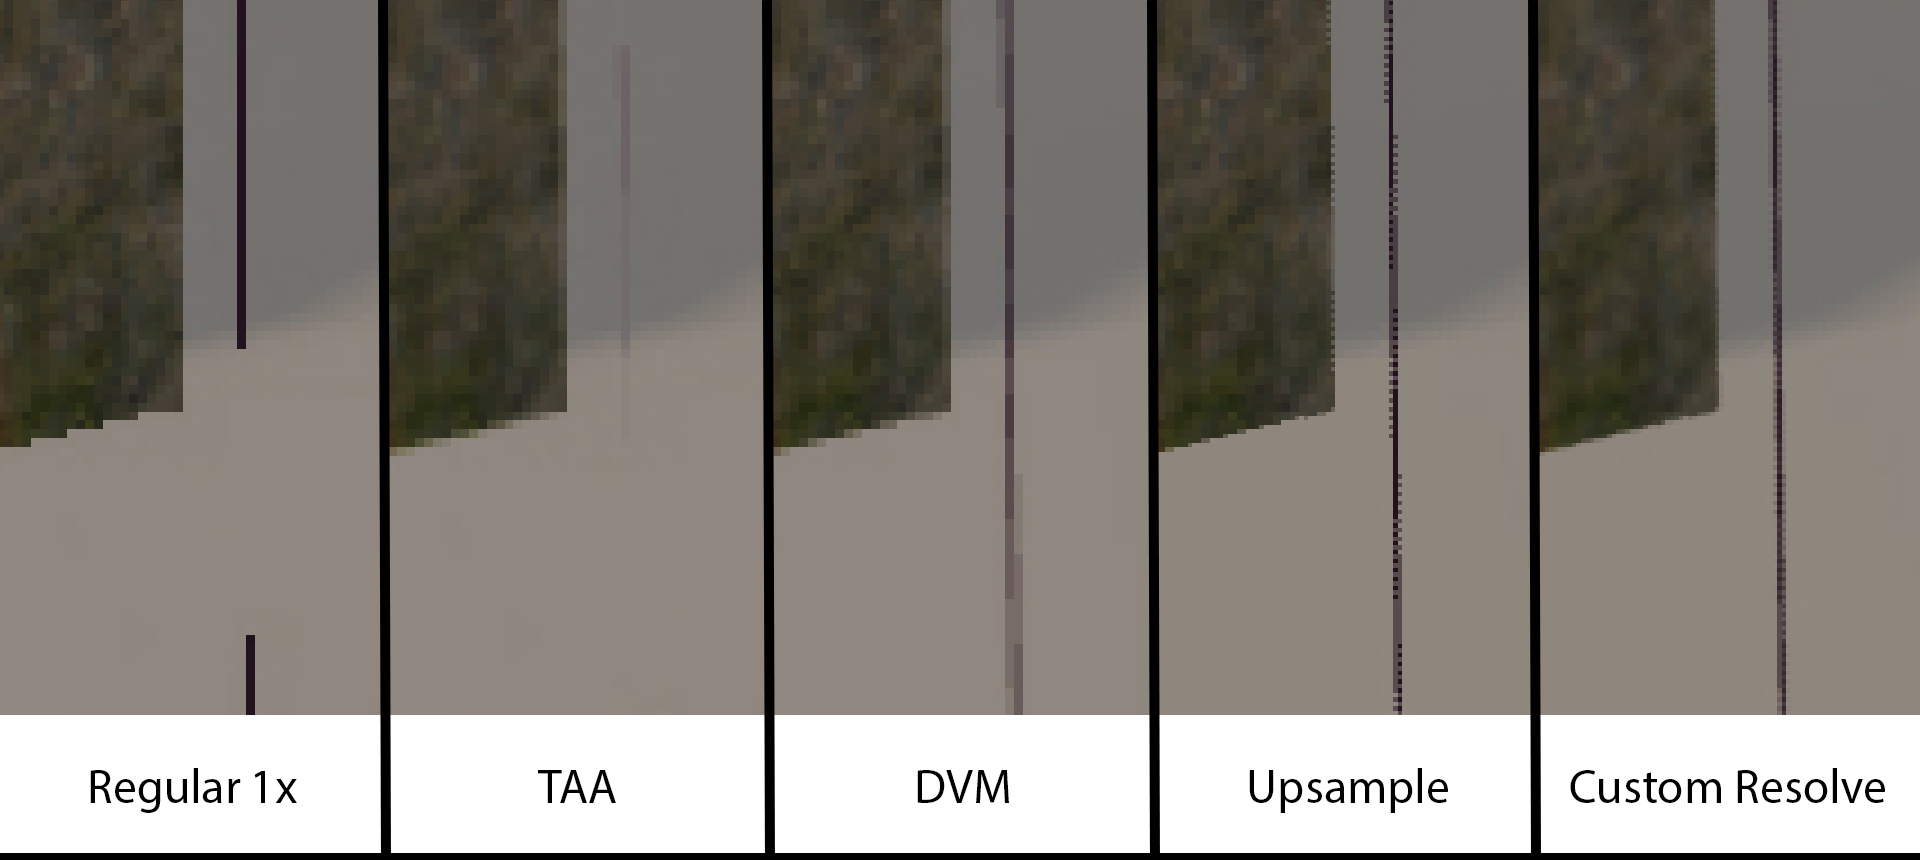
By decoupling our geometry sampling rate from our shading rate, we have several ways of merging the different types of information. The Decoupled Visibility Multisampling post demonstrated a method for rendering Visibility with 8xMSAA but rendering a GBuffer at 1x. Then it can reconstruct the edges at 8xMSAA quality. To recap, regular TAA starts with a standard, aliased 1x frame:
Aliased 1x Frame:
Over time, the standard TAA algorithms can effectively reconstruct edges in some cases by accumulating multiple aliased frames together. TAA works very well for solid objects when the camera has little movement, but fails when there is significant movement or when a thin object is less than a pixel wide. For a more thorough discussion of TAA algorithms, I’d recommend the recent overview by Lei Yang, Shiqiu Liu, and Marco Salvi [6].
TAA:

As discussed previously, we can use the multisampled visibility buffer to reconstruct the lighting at subsample rate. This process allows better reconstruction of thin edges. It is also robust against movement, since it can reconstruct edges based on a single frame.
Decoupled Visibility Multisampling:
With an 8xMSAA buffer, there is more that we can do. A single 8x MSAA pixel is roughly equivalent to a 2x2 group of 2xMSAA pixels. We can demonstrate this by doing do a trivial reconstruction at higher resolution.
Decoupled Visibility Multisampling with Naive 2x Upsample:

If we look closely, the one disadvantage is the jagged edges that appear. We can minimize this effect by applying a light, half-pixel wide filter on the edges. While the zipper effect is not entirely gone, it is no longer visually noticable at typical viewing distances. I.e. you will not be able to see this zipper pattern on a 4k television that is 8 feet away. But there are options to reduce this artifact if it is a priority.
Decoupled Visibility Multisampling, with 2x Upsample and Custom MSAA Resolve:

Multisampled Visibility Rejection
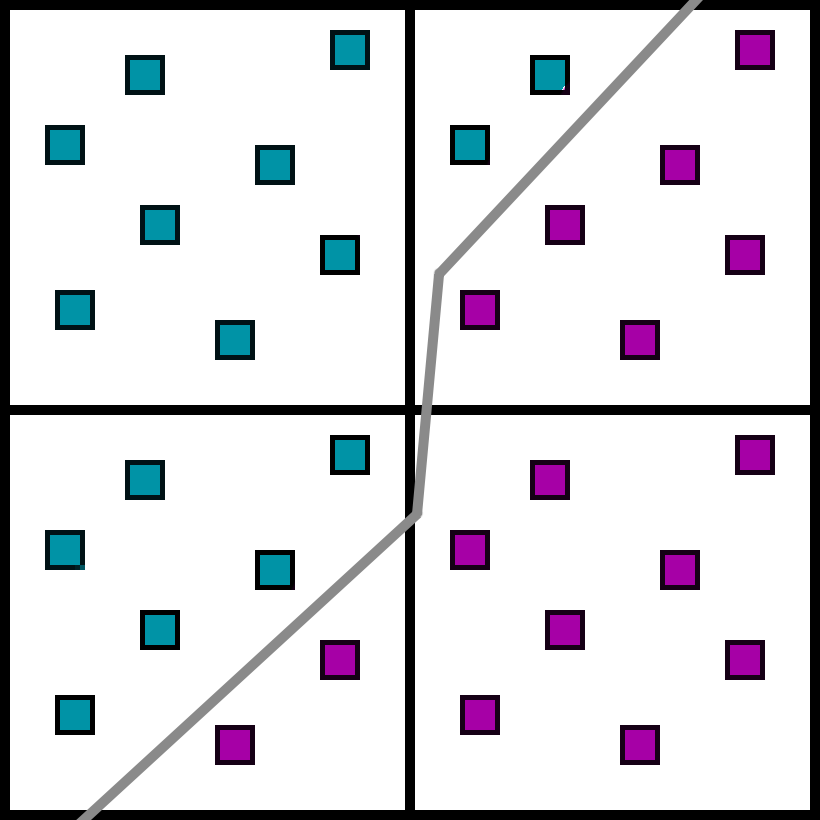
One of the key elements of Decoupled Visibility Multisampling is that we can encode the coverage for each subsample. In a given 2x2 block of pixels, we have 4 pixel colors, and 4 masks (32 bits each) so we know which subsample is covered by which material. In this particular case, we have two different materials covering this 2x2 block of pixels.
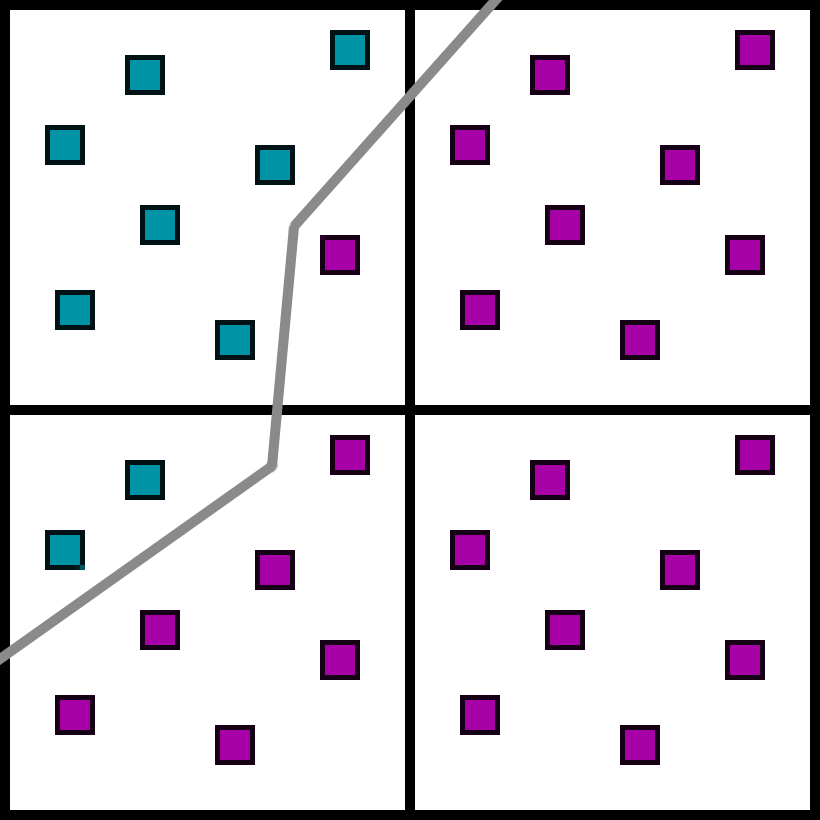
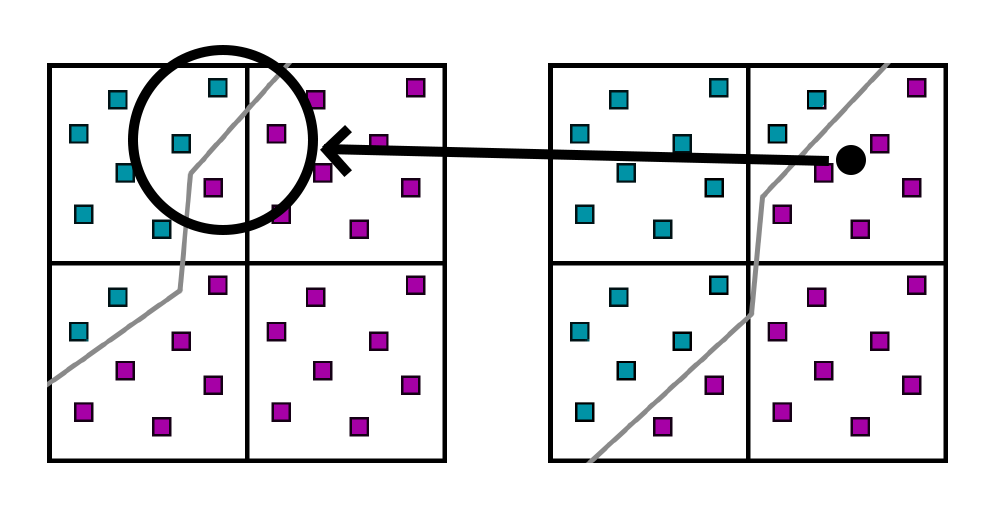
Suppose that in the next frame the object shifted by a fraction of a pixel. Now the material edge is slightly to the right:
In typical TAA, we would reproject from the previous pixel. Since the previous pixel is merged into a single color in standard TAA, we would have no choice but to sample from the previous accumulated value, which has both materials blended together.
However, we have the subpixel history encoded in the coverage mask. So we can discard pixels that are not part of this material, and accumulate the image.
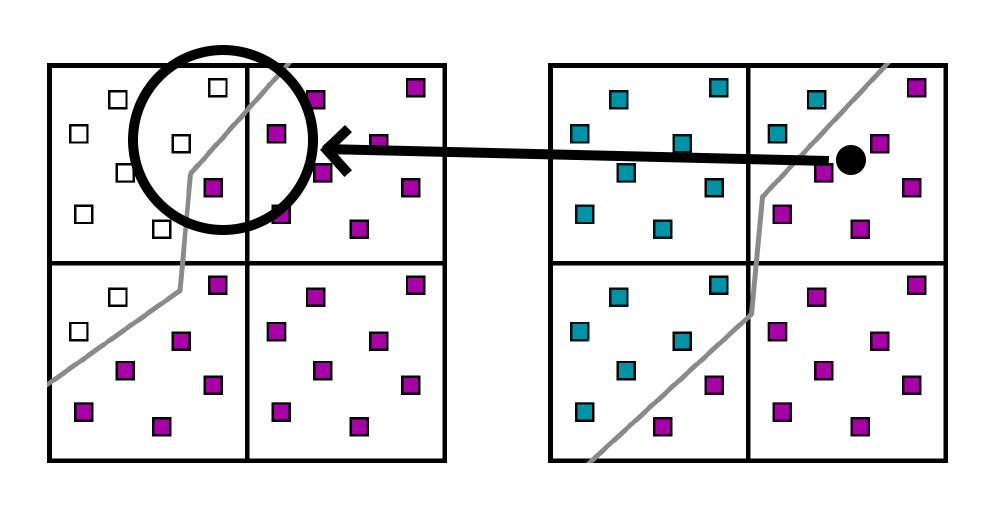
There are many types of ghosting in TAA, but by far the most common is when the accumulated history is from a different material than the current pixel. By only gathering subsamples from the same material, this kind of ghosting is completely eliminated. There are other types of ghosting of course, such as depth discontinuities or lighting/shadow changes. But ghosting of one opaque object onto another becomes a solved problem.
The visibility information for a 2x2 quad is encoded into 4 32-bit masks, so we can reject invalid samples by doing a careful bitwise dot product of the current mask with the previous mask. The actual implementation could be much improved though. For each pixel, the implementation recovers the previous frame’s 2x2 group of 2x2 quads (for a full block of 4x4 pixels). This pass has very poor occupancy because that 4x4 block of pixels is stored for each thread, and each pixel is 3 floats. Reducing that is a prime target for optimization if more time were available.
Efficient Upsampling
Since we have 8x MSAA visibility information, we can experiment with reconstruction algorithms. Note how the 8x MSAA pattern compares to the 2x MSAA pattern. Here is the image from the HLSL spec of MSAA patterns [3]
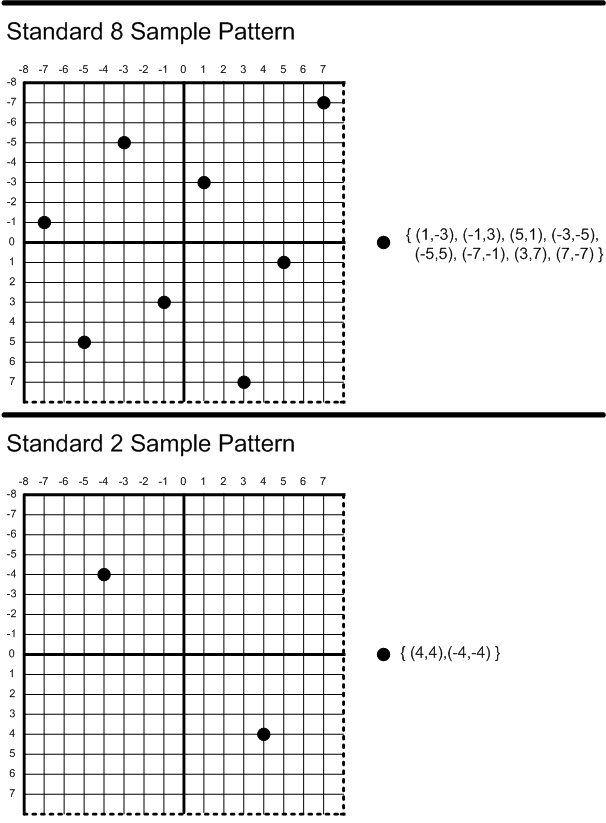
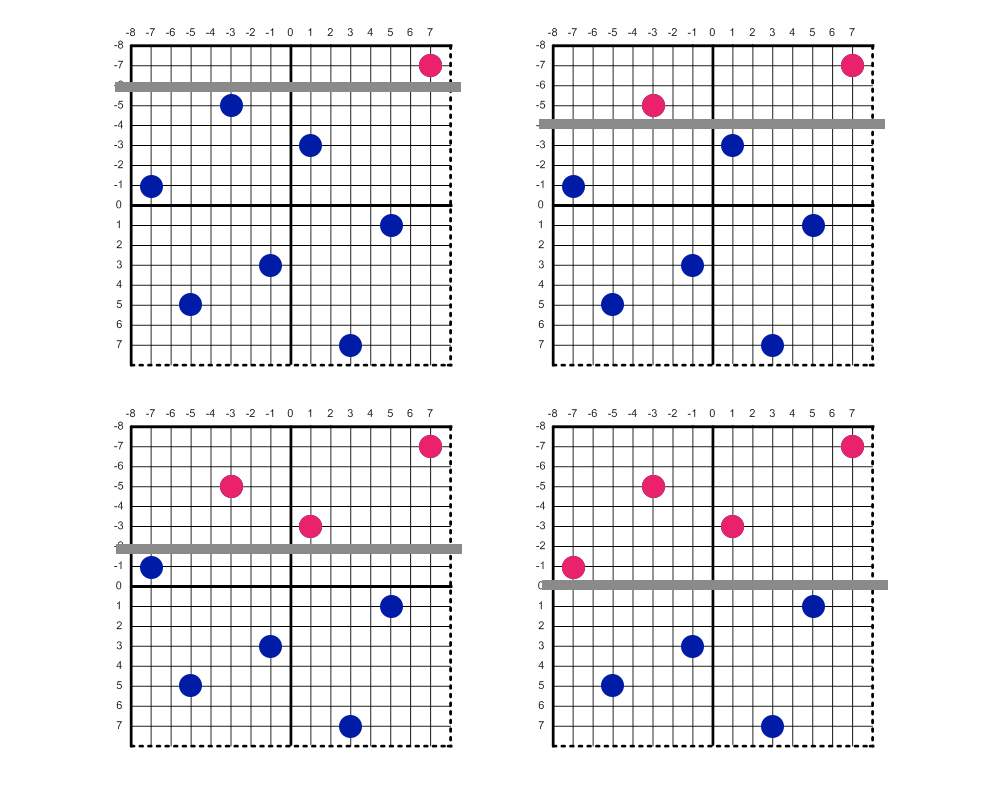
Each quadrant of the 8x MSAA pattern is very similar to a rotated 2x MSAA pixel. We can resolve at 1x resolution with a box filter by averaging all 8 samples together. To upsample and resolve the image at 2x resolution with a box filter all we have to do is blend the 2-pixel quadrants together. 8x MSAA at 1080p is roughly equivalent to 2x MSAA at 4k. Here is a comparison between sample positions of a 1080p image with 8x MSAA versus a 4k image with 2x MSAA.
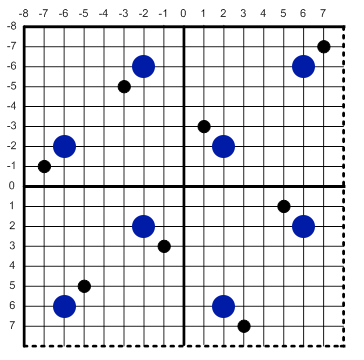
Comparison of 8x MSAA sample points overlayed with 2x MSAA sample points from double the resolution. Note that the 2x MSAA positions have a 90 degree rotation from their original positions.
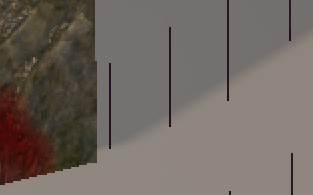
And here is the image after a naive upsample resolved with a box filter. Each pixel is calculated from averaging the two subsamples in a quadrant.
Note that this algorithm introduces a zipper pattern along edges. This effect happens because an edge can cut through the samples in such a way that even pixels intersect with one material and odd pixels intersect with the other. For the two pixels on top, there are 4 different ways that a nearly horizontal edge can cut through.
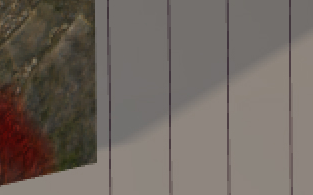
The two scenarios on the left will show a zipper pattern whereas the two on the right will not. We can fix this to a degree by using a more advanced MSAA resolve. For a thorough explanation, you should play some Kenny Loggins and read Matt Pettineo’s post where he explores different custom MSAA resolve filters [5]. This image below uses a triangle filter pattern with a half-pixel radius.
Note that the stairstepping is still visible, but is much less pronounced. There are several ways that we could properly fix this effect:
- Custom Sample Positions: We could use programmable sample positions to exactly emulate 2x MSAA.
- Wider Blur: We could increase the resolve radius to blur it out.
- Smarter Upsample: Since we have visibility, we could actually detect this case by checking the material IDs and apply a special fix.
Of those options, the one that makes the most sense to me is #3. It shouldn’t be too difficult to detect the zippers. The difficult part is optimization, and it would need to be optimized in tandem with the custom resolve. Note that with solution #1, we could change the sample positions but long jaggies would only have two levels of gradients. By upsampling from 8x MSAA we can theoretically actually achieve cleaner edges than a double-resolution image with 2x MSAA. A 1080p, 8xMSAA image upsampled to 4k has 4 gradations of color in long jaggies whereas a native 4k, 2xMSAA image only has 2 gradations of color in long jaggies.
Also, the interior of the triangles look just as blocky in the 1x standard and 2x upsampled versions. There has been great research in temporal upsampling, including DLSS from NVIDIA [4], FidelityFX from AMD [1], and Super-Resolution in Unreal 5 [2]. In short, this problem is well-studied with several excellent solutions. The contribution of this post is in upsampling with clean edges along borders, and the problem of how to render the interiors is mostly orthogonal.
In total, the render time is quite consistent. At 1080p, here are the timings for four different variations.
- Regular 1x: Standard TAA algorithm
- DVM 1x: This pass applies visibility-aware accumulation, and runs a second pass to resolve to 1x.
- DVM 2x Upsample: This version applies visibility-aware accumulation, and applies a 2x upsample.
- DVM 2x Custom Resolve: This approach is the same as DVM 2x, except that it applies a custom MSAA resolve.
TAA/Resolve Cost:
| Accumulation | Resolve | |
|---|---|---|
| Regular 1x | 0.161 | |
| DVM 1x | 0.869 | 0.082 |
| DVM 2x Upsample | 0.869 | 0.103 |
| DVM 2x Custom Resolve | 0.868 | 0.733 |
The regular 1x version of TAA requires about 0.161ms to render for each frame. The accumulation step is quite a bit more expensive than before, taking 0.869ms. The box filter resolves are quite fast, at 0.082ms and 0.103ms, but the custom resolve is vastly more expensive at 0.733ms.
Since this is a toy engine, it didn’t make sense to spend the time doing proper optimization. I did some preliminary optimizations (the original was 5ms or so), but honestly 1.6ms for both combined passes is still too expensive. The path to optimize the compute shaders is clear so I left that out due to time constraints.
Putting it all Together
The different aspects of visibility rendering really synergize, and we can run VRS as well. With a 1080p “native” image, 25% VRS and a 2x upsampling, we can render a pretty respectable 4k image even though the number of pixels we are shading is the equivalent of 540p.
References:
[1] AMD FidelityFX, Super Resolution. AMD Inc. (https://www.amd.com/en/technologies/radeon-software-fidelityfx-super-resolution)
[2] Unreal Engine 5 Early Access Release Notes. Epic Games, Inc. (https://docs.unrealengine.com/5.0/en-US/ReleaseNotes/)
[3] D3D11_STANDARD_MULTISAMPLE_QUALITY_LEVELS enumeration (d3d11.h). Microsoft, Inc. (https://docs.microsoft.com/en-us/windows/win32/api/d3d11/ne-d3d11-d3d11_standard_multisample_quality_levels)
[4] NVIDIA DLSS. NVIDIA Inc. (https://www.nvidia.com/en-us/geforce/technologies/dlss/)
[5] Experimenting with Reconstruction Filters for MSAA Resolve. Matt Pettineo. (https://therealmjp.github.io/posts/msaa-resolve-filters/)
[6] A Survey of Temporal Antialiasing Techniques. Lei Yang, Shiqiu Liu, and Marco Salvi. (http://behindthepixels.io/assets/files/TemporalAA.pdf)
comments powered by Disqus