
In the previous post, I talked about how a Reinhard curve, when applied to each channel individually, will desaturate your blacks. In fact, any curve that is concave downwards will do the same thing. But if we use a curve that is concave upwards, will it do the opposite, and give us more saturation in our blacks?

The answer is yes. HP Duiker refers to this effect as getting “crisp blacks” as opposed to “milky blacks”.
Here are the two pixel shaders, one for how to apply Reinhard, and another on how to apply a Filmic Curve. For the Reinhard curve, you are applying the formula x/(x+1), followed by a pow(x,1/2.2) to compensate for your monitor’s gamma. In the filmic curve, the monitor’s gamma is built in, so you just apply the formula directly.
float4 ReinhardMain( float2 texCoord  : TEXCOORD0 ) : COLOR
{
   float3 texColor = tex2D(Texture0, texCoord ); // Tex Read
   float3 retColor = texColor/(texColor+1);  // Reinhard
   retColor = pow(retColor,1.0f/2.2f); // Gamma
   return float4(retColor,1);
}
float4 FilmicMain( float2 texCoord  : TEXCOORD0 ) : COLOR
{
   float3 texColor = tex2D(Texture0, texCoord ); // Tex Read
   float3 x = max(0,texColor-0.004); // Filmic Curve
   float3 retColor = (x*(6.2*x+.5))/(x*(6.2*x+1.7)+0.06);
   return float4(retColor,1);
}
Here is the filmic curve compared to Reinhard. To make it easier to see, I’m doing both formulas in linear space, with both NOT adjusting for the monitor’s gamma. To be explicit, here are the two formulas that I’m graphing.
Reinhard: R(x) = x/(x+1) Filmic: R(x) = pow((x(6.2x+.5))/(x(6.2x+1.7)+0.06),2.2)
I know it’s a little confusing with the 2.2s in there, but you have to understand it. We should always be comparing plain Reinhard against Filmic with a 2.2 or Reinhard with a 1/2.2 against the plain Filmic curve.
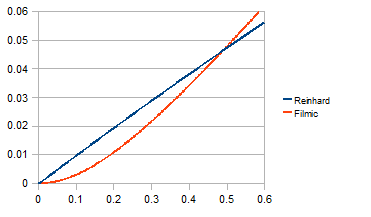
Now let’s compare them. They both taper off at 1.0, but at a first glance, it would seem that neither one does anything interesting at the bottom end.
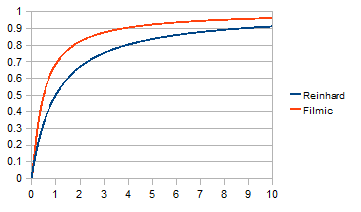
Of course, you know me better than that. If you look at the bottom end of the curve, the filmic curve has a little bit of a toe at the very bottom.
That’s the “trick” behind the filmic curve. By the way, real film has been doing this effect for decades. That’s what film purists refer to as the film “S” curve. Google it.
Finally, we can do this for any color that we’d like. Here are 8 examples of different colors, where the top row is Reinhard per-channel, middle is linear, and bottom is Filmic.


Also, we can even do this trick with grey. While we aren’t getting more saturation, we are still getting crisper blacks at the bottom end of the gradient.