Is anyone using temporal reprojection to improve MSAA?
Temporal anti-aliasing (TAA) has been around for over 10 years [8][1] and various approaches have been used to apply super resolution as well [2][3][4][5][9][10][11]. MSAA has been around even longer, so it would make sense to use temporal information to improve the quality, right?
I spent quite a bit of time trying to find existing references, but temporal information with MSAA seems largely unexplored. SMAA S4 [6] uses a hybrid of 2x MSAA and temporal information, and a few approaches incorporate reprojection with a checkerboard pattern [12]. Additionaly, The Order: 1886 [13] uses a custom 4x MSAA resolve with temporal information without applying a jitter pattern. But I have not been able to find references to using larger MSAA patterns with longer jitter patterns.
For this test, we will stick with 4x MSAA at 1080p, and then upsample into a 4k buffer (just as the previous post). I highly recommend reading that post before this one, as this post builds that algorithm. The difference is that we will offset each frame by half a pixel in a 4 frame cycle with the following jitter pattern.
int jitterIndex = GetFrameIndex() % 4;
float jitterX = 0.5f * (float)(jitterIndex%2);
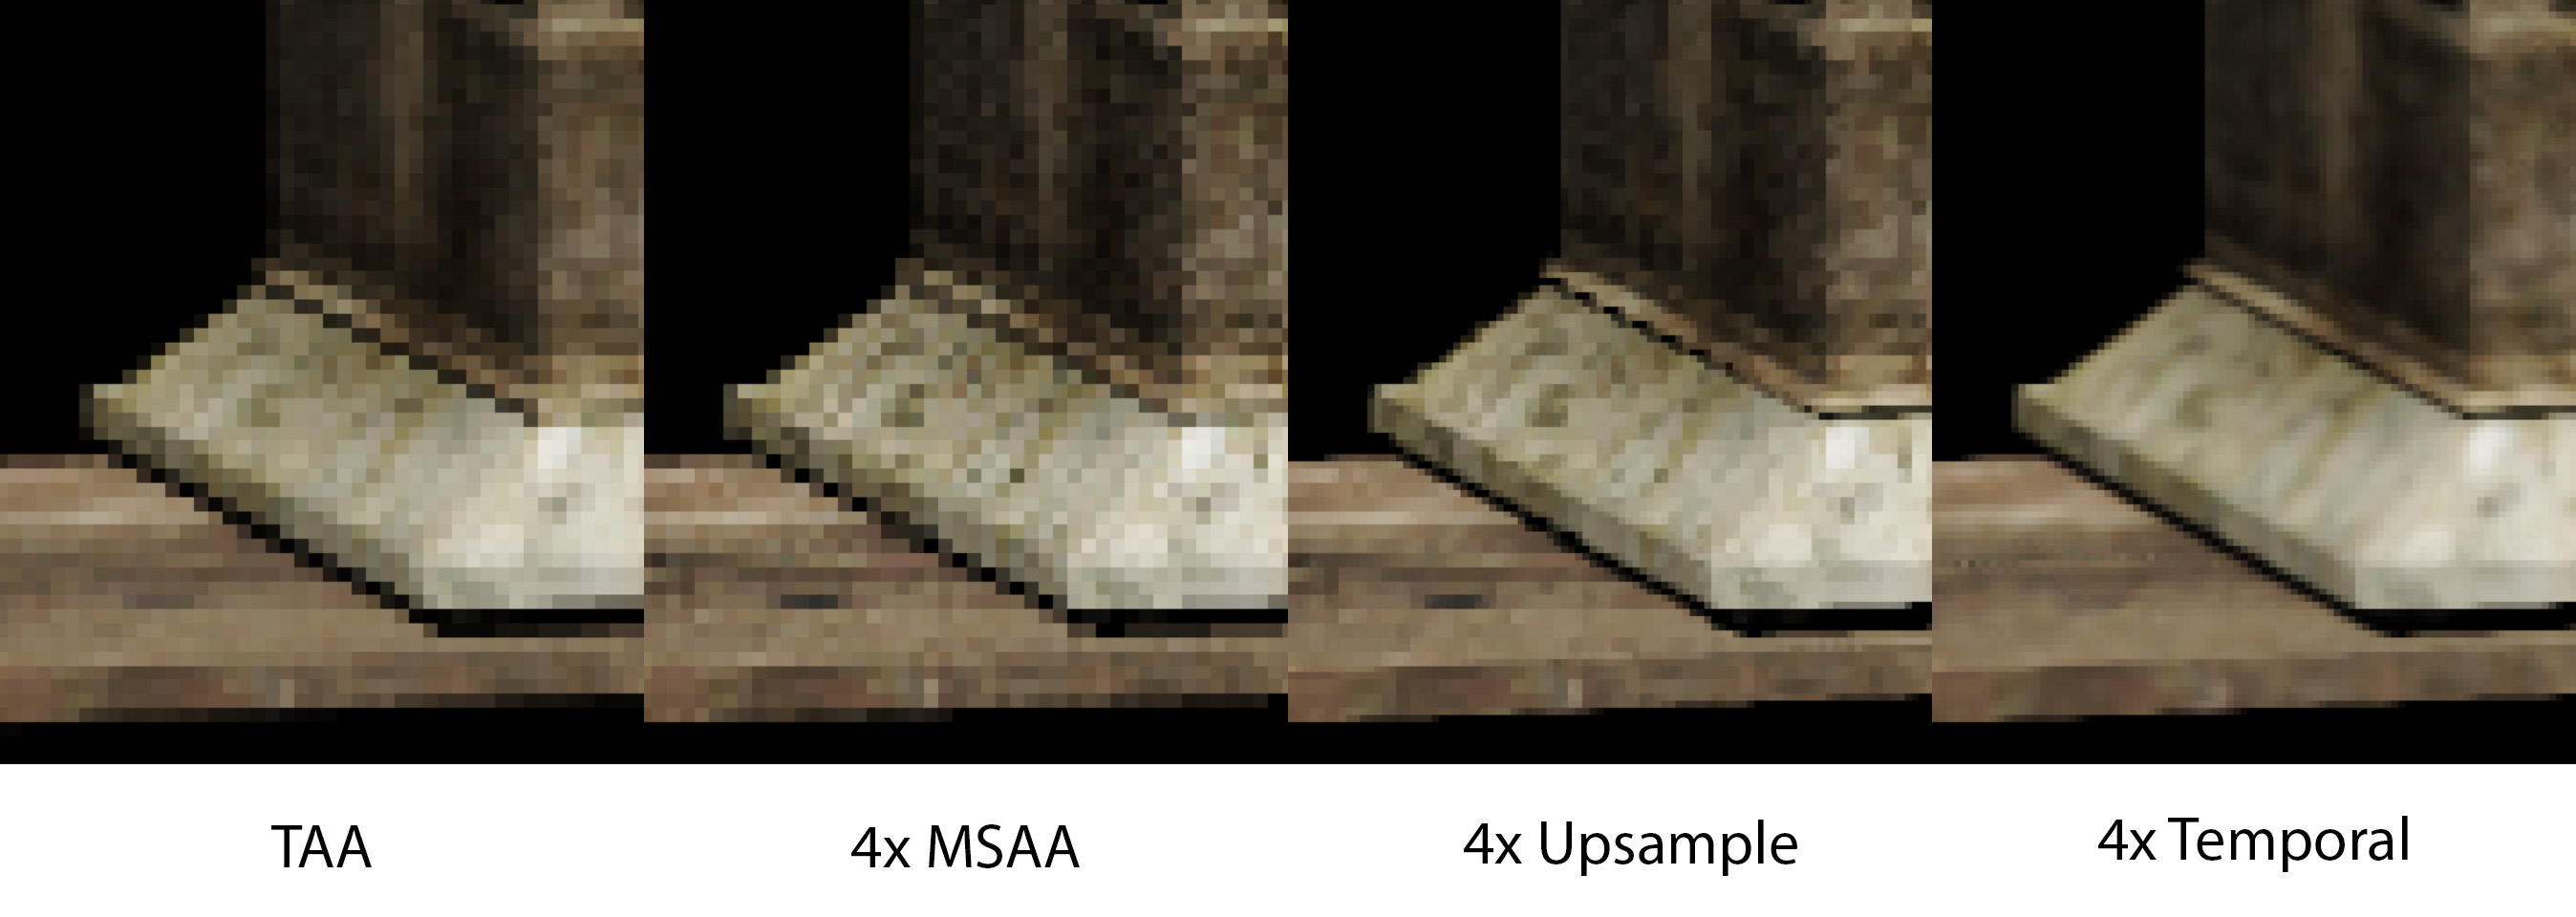
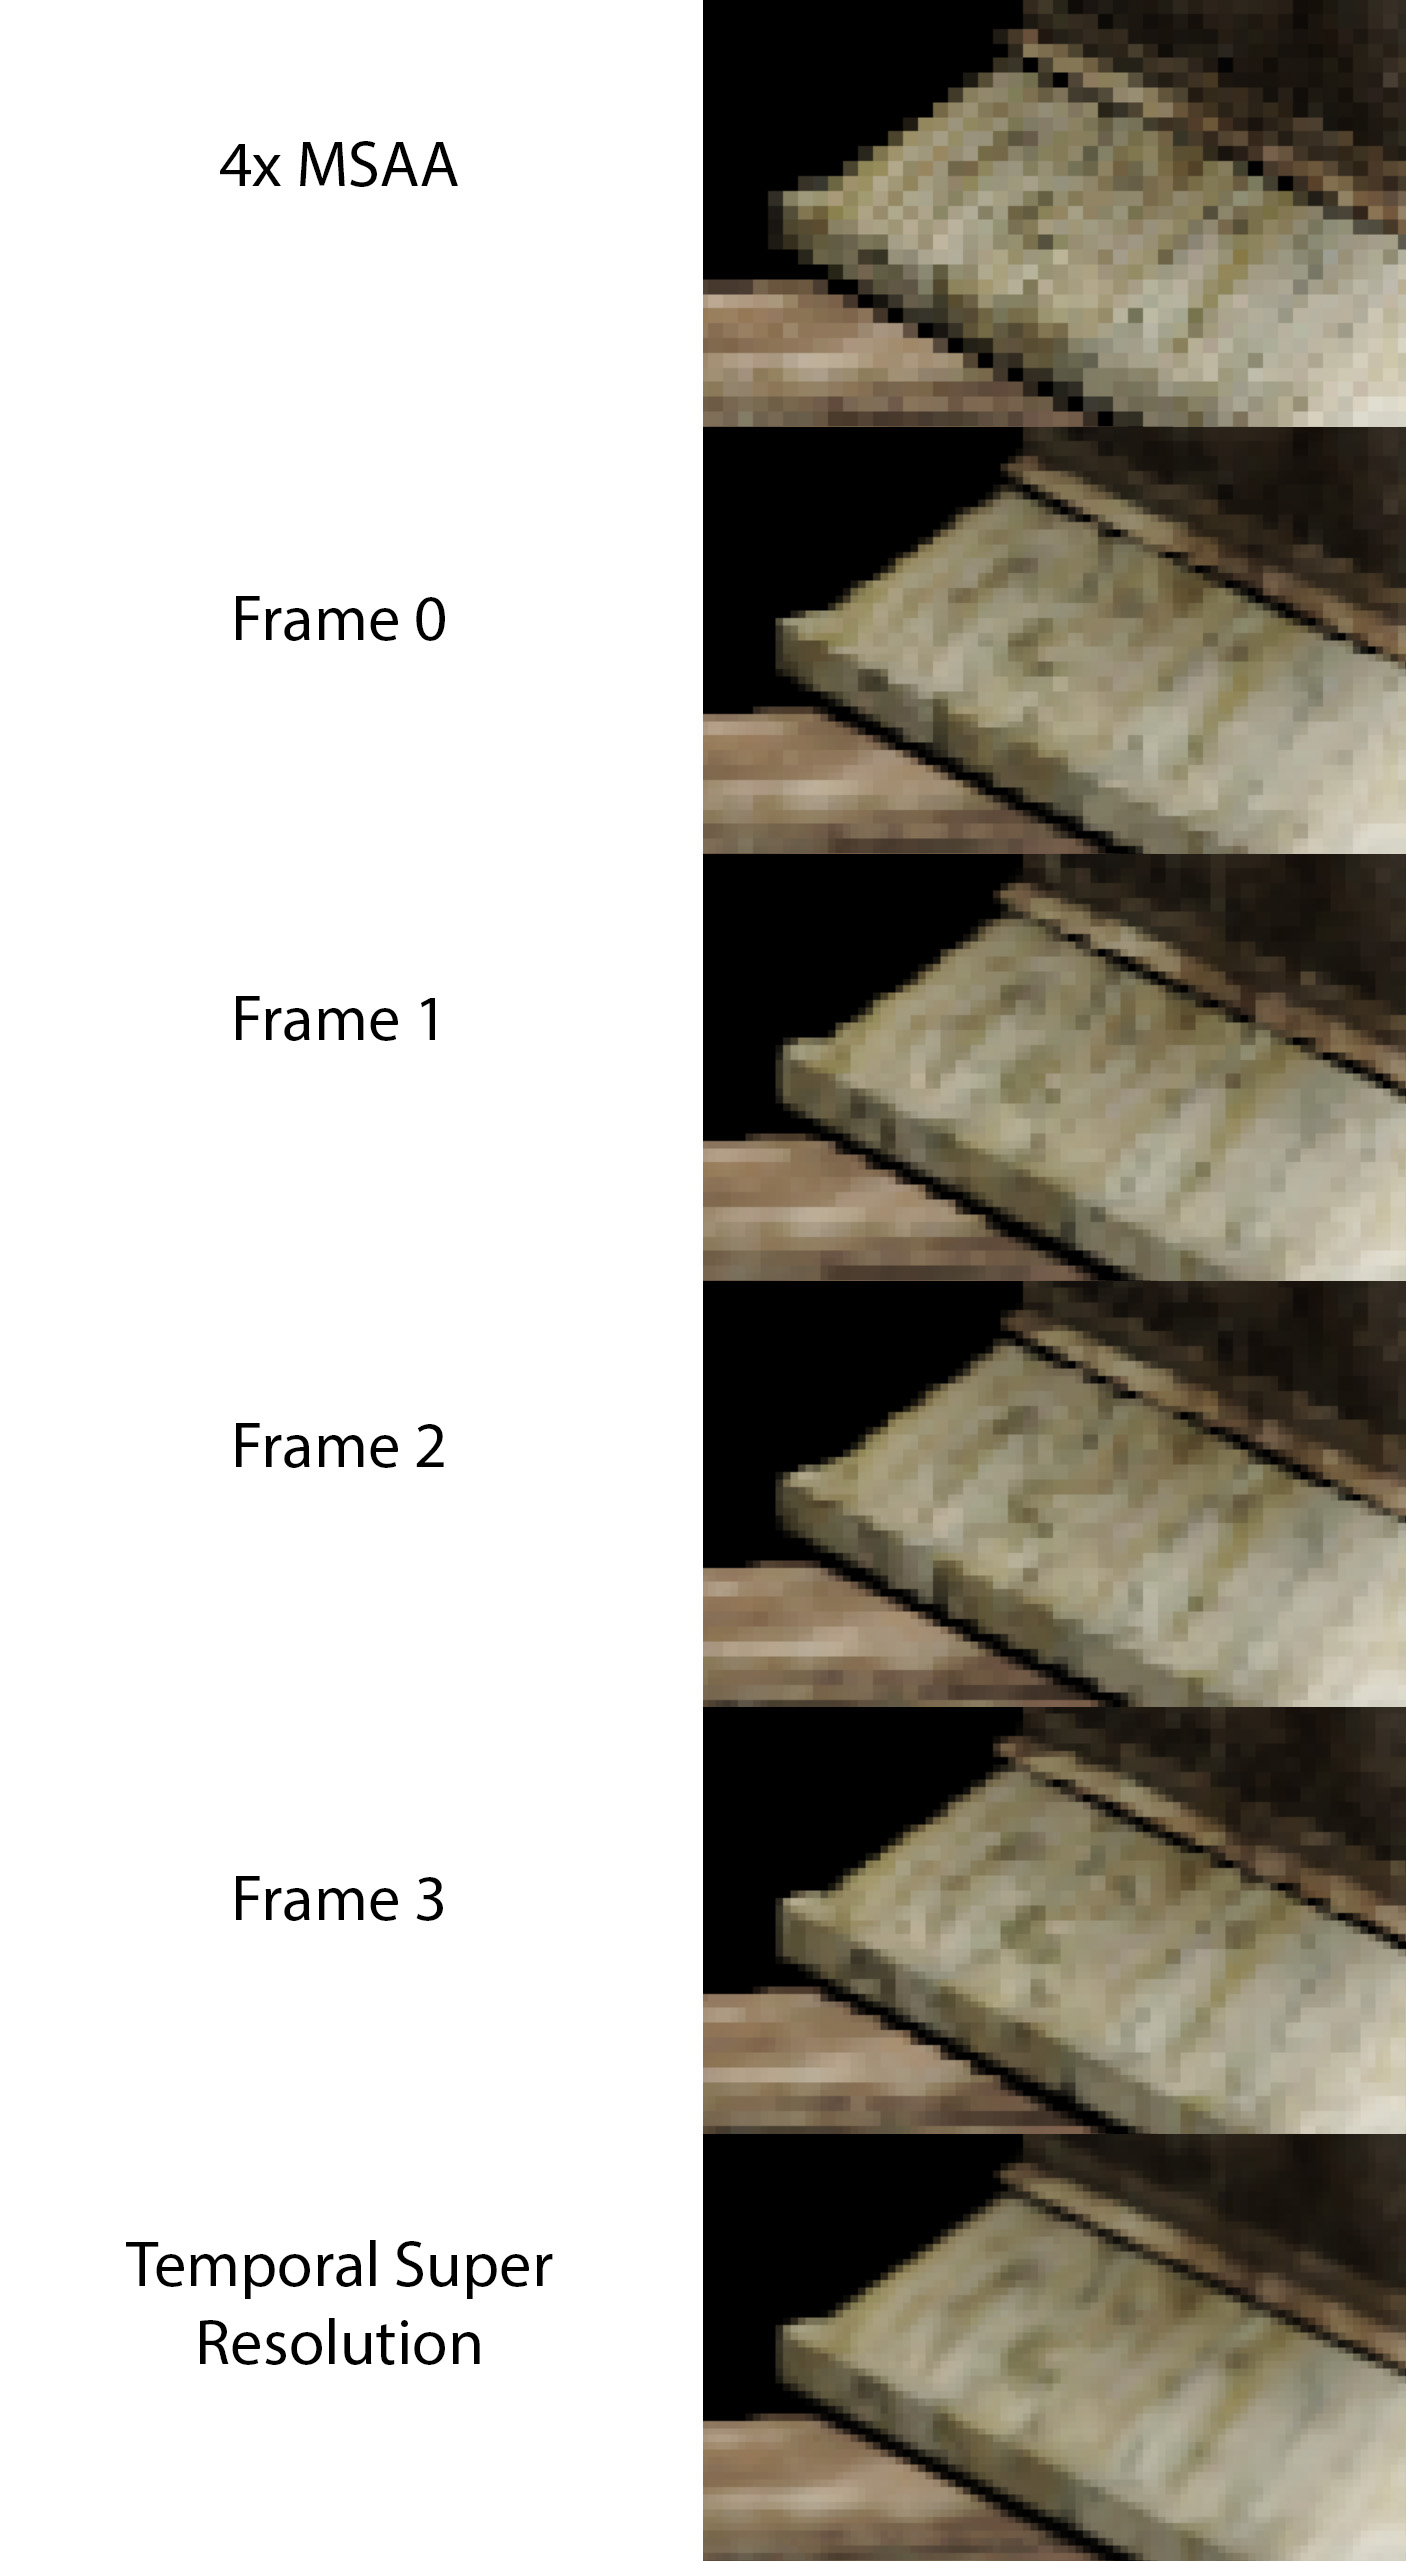
float jitterY = 0.5f * (float)j(itterIndex/2);There are other ways to jitter the image, but this simple pattern above has some helpful synergies with 4x MSAA at a 4x area upsample. In the header image of this page, the left image shows a standard TAA implementation and the second image shows the same scene with 4x MSAA using a standard box resolve. The third image shows a 4x upsample using the algorithm from the previous post. Then the fourth image shows a temporal super resolution image using the algorithm from this page.
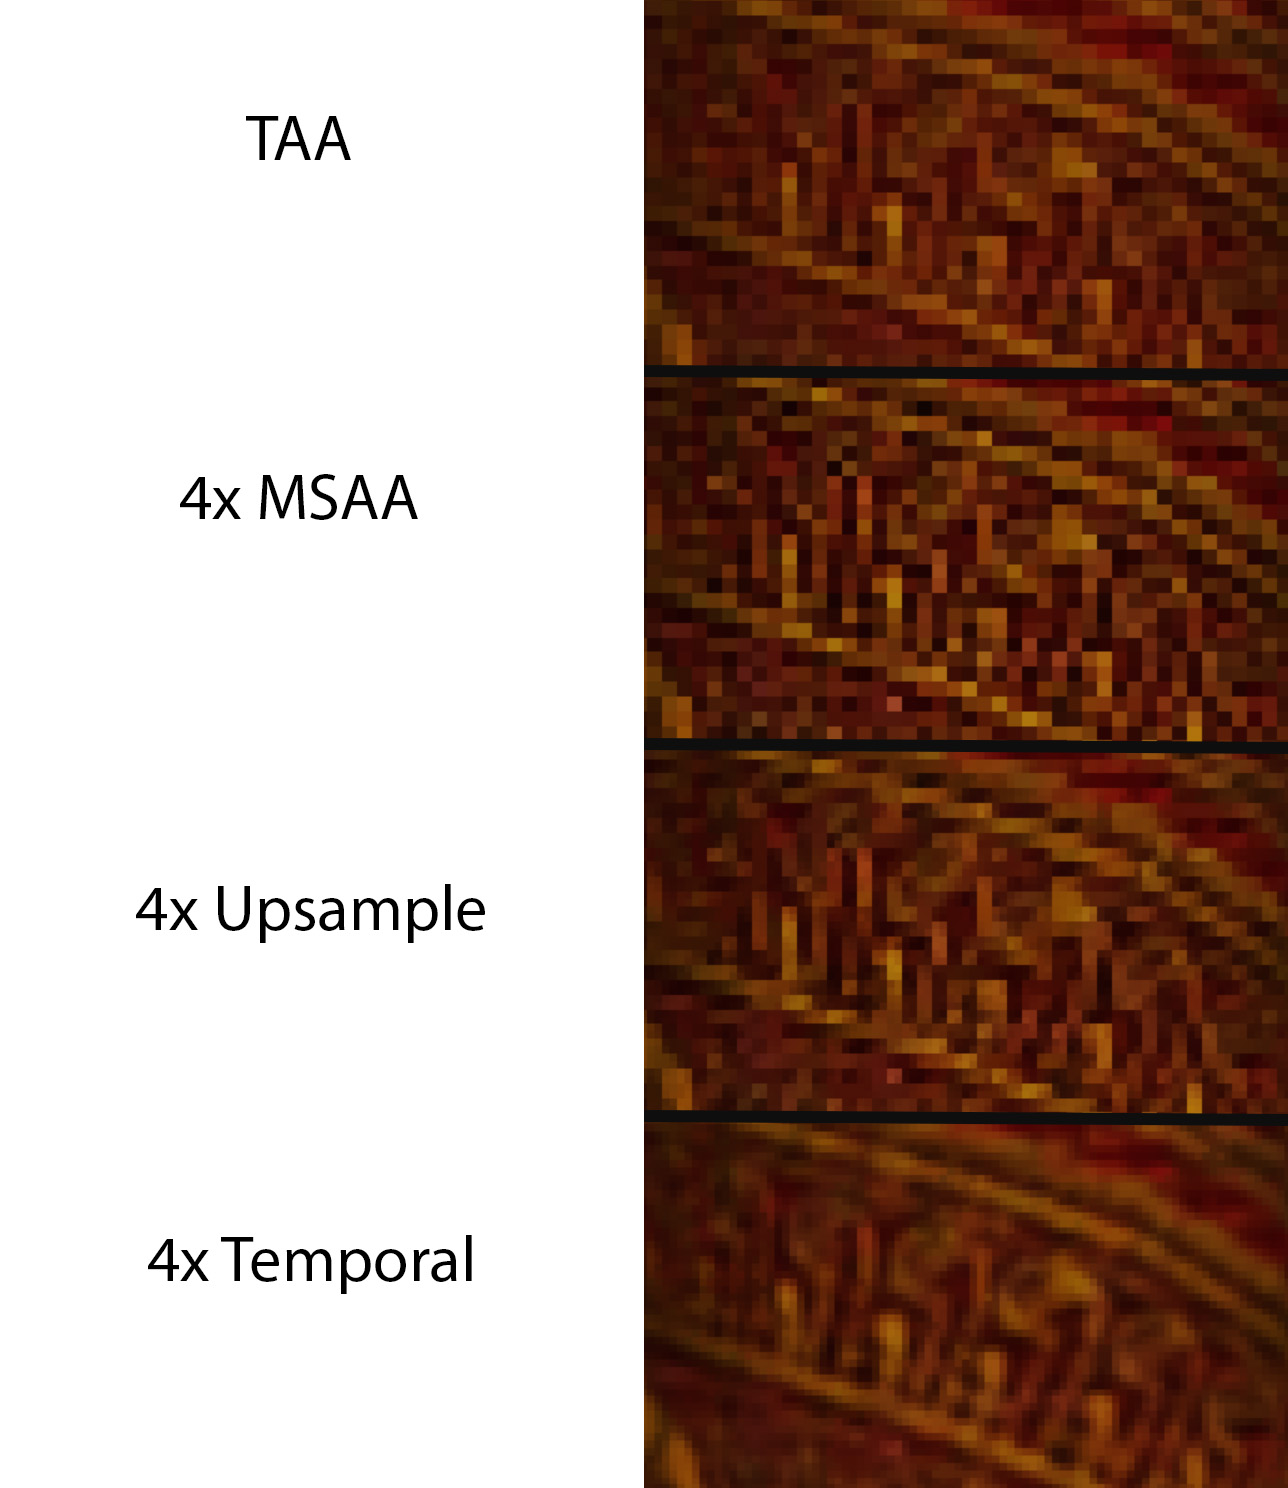
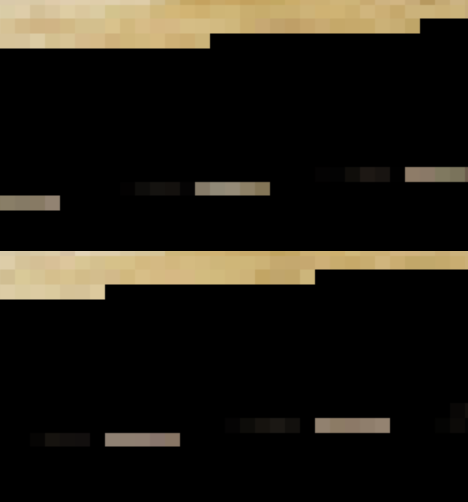
Edges are important, but what about texture detail? The following image below shows a comparison of the curtains in Sponza. The TAA, 4x MSAA, and spatial upsample from the previous post are all unable to resolve the pattern on the curtain. However, by using a 4 frame jitter with temporal super resolution we can clearly resolve it.
Limitations of Single Frame Upsampling
Looking back at the previous post, there are a few obvious limitations of using a single MSAA frame. To keep things simple, we will only focus on the 4x MSAA version (and ignore the 2x and 8x MSAA variations).
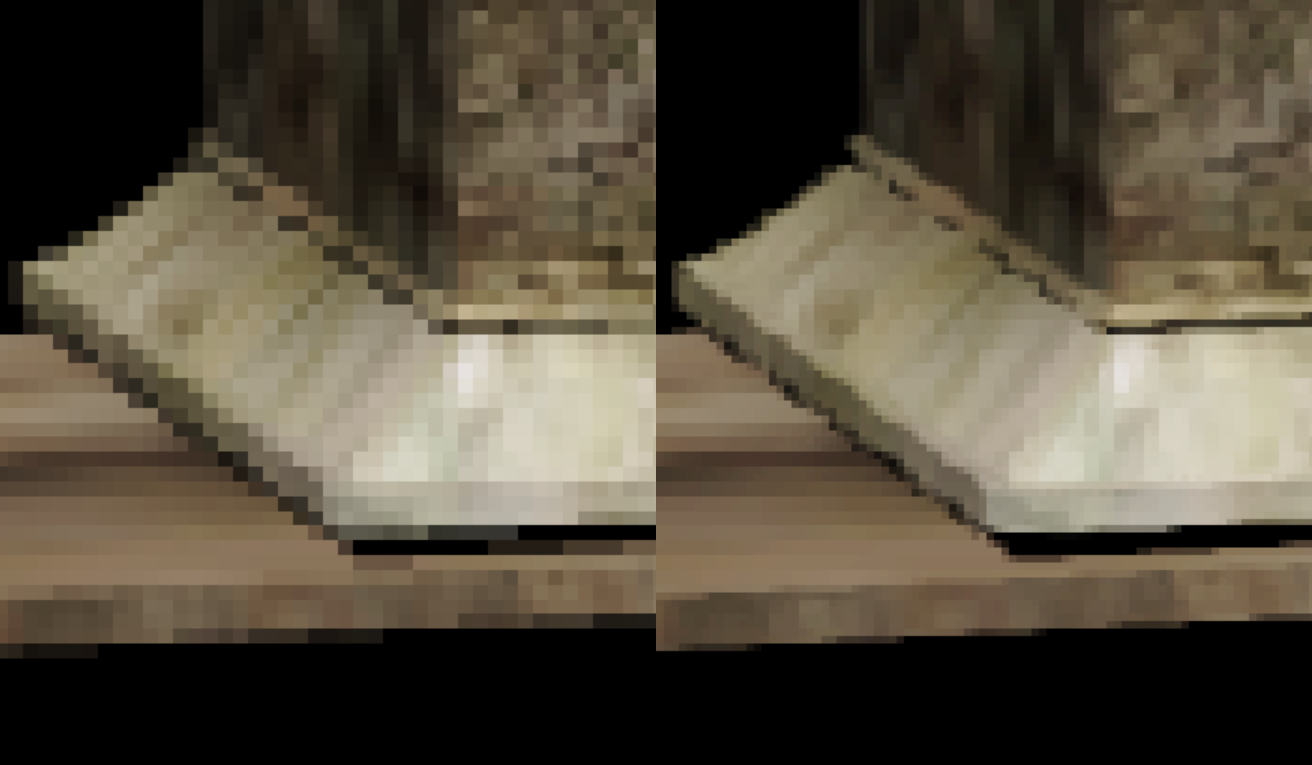
A comparison of a 4x MSAA standard resolve (left) and 4x MSAA Upsample Image from the previous post (right).
Jitter for 4x MSAA
The key issue with 4x MSAA is that while we are calculating color samples at 4 positions per pixel, we are reusing the same information at all 4 samples if they are covered by the same quad.
In the previous post we are able to get increased edge quality around the edge between different triangles. However, for the flat parts of triangles we end up with blocky 2x2 pixels that are all the same color.
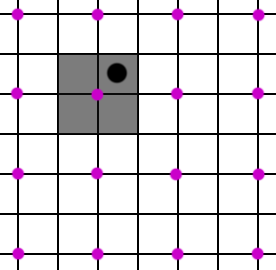
Let us take a look at a single pixel. Our goal is to render a 4x MSAA image at 1080p and apply it to a 4k output (4x area scaling). Let us look at one of these output pixels in black.
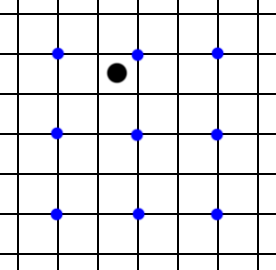
Assuming we are not on a triangle edge, a single sample point in blue will write to the 4 adjacent high-res pixels. In a single frame, our target black pixel uses the nearby blue pixel for its color.
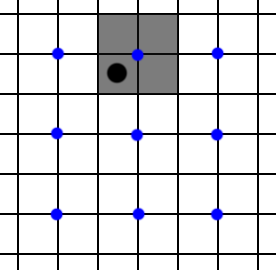
But what happens if we shift the sampling horizontally by half a pixel in the source grid? Of course, “half a pixel” in the original 1080p 4xMSAA image is the same a “full pixel” in the output 4k image. The black pixel will get a color from a different sampling position.
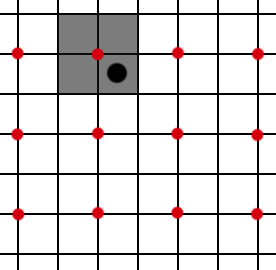
Next, we can offset the sampling vertically.
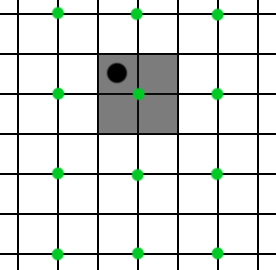
And one more time, now vertically and horizontally.
Then we can repeat this cycle of 4 offsets and each output pixel will converge to the sum of the four neighbors on its corners.
This is the key insight into temporal super resolution using MSAA. With this 4 cycle pattern, the output image converges quickly. Additionally, this algorithm allows us to resolve smaller details which can not be resolved from filtering/sharpening a single lower-res image. But what about the other major problem of wobbly edges?
Wobbly Edges
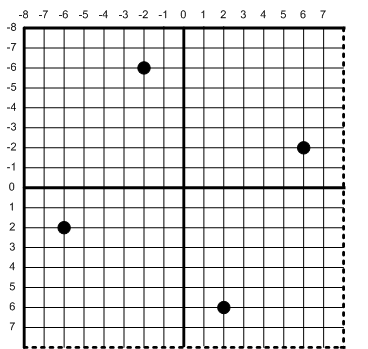
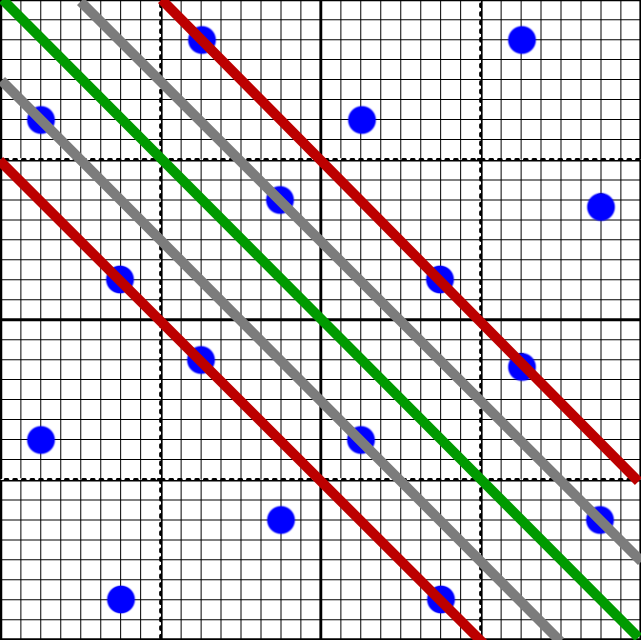
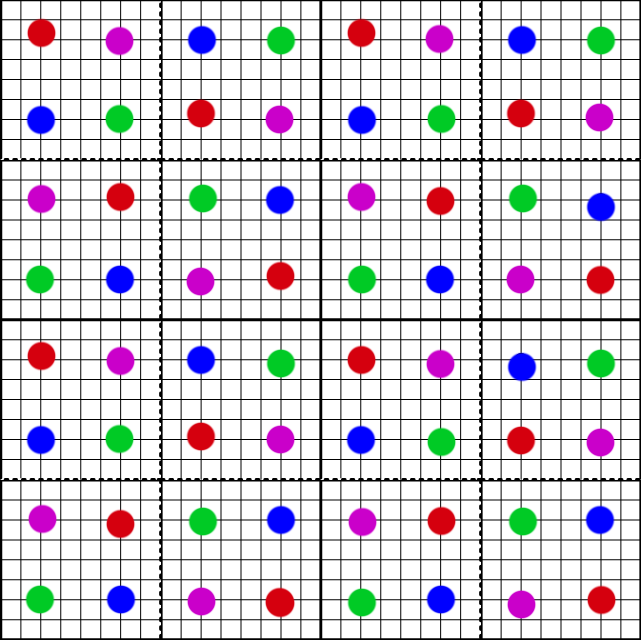
Going back to the previous post, we end up with a little bit of wobbling in diagonal edges. Why is this? To start, let us take a closer look at the 4x MSAA pattern. As a rotated grid, the MSAA pattern solves the “4 rooks” problem. If we assume that the pattern is a 4x4 chessboard, and all 4 sample points are rooks, they would not be able to attack each other.
If we draw a horizontal line through each sample point, each line only touches one sample point per MSAA pixel.
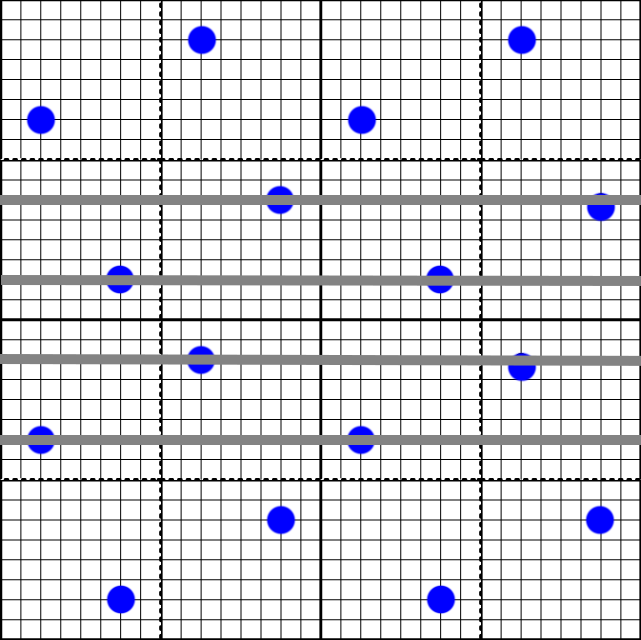
Similarly, for vertical rows, each line only touches a single sample point per MSAA pixel.
However, this is not true for diagonal lines. For the diagonal case, two of the sample points are on their own line (samples 0 and 3). But samples 1 and 2 share the same line (in red). And there are no samples on the line that goes through the origin (in green).
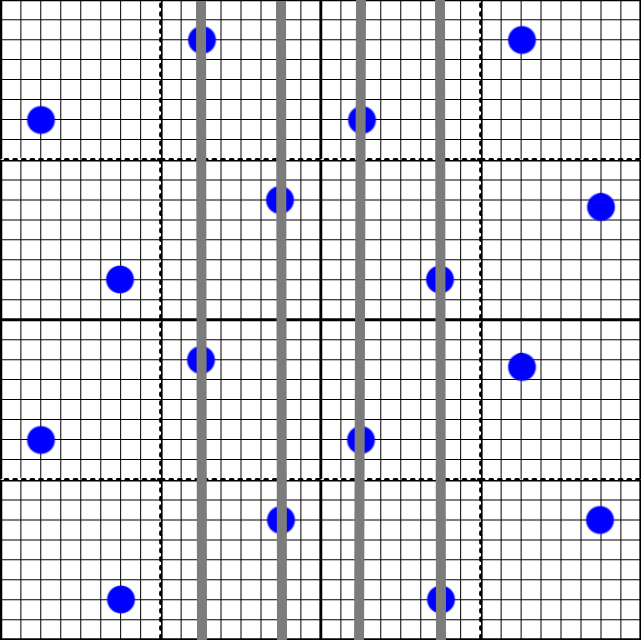
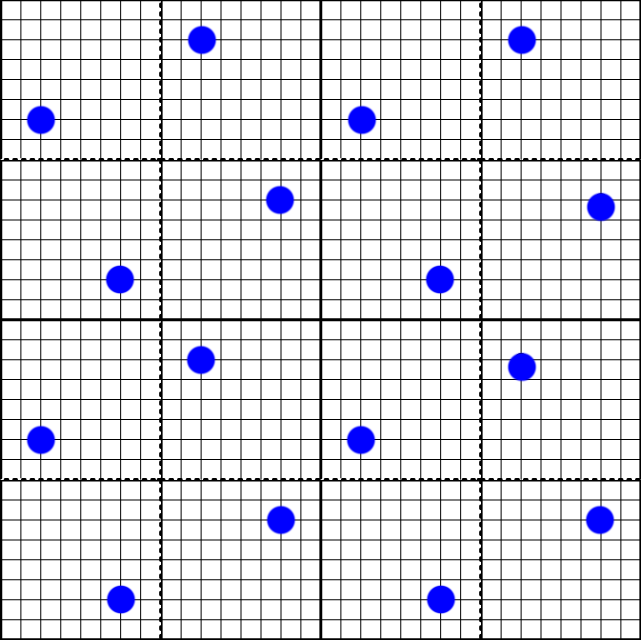
If a triangle edge goes through a pixel at a near 45 degree angle, the actual coverage of the triangle will depend heavily on how that edge is aligned to the sample grid, which results in wobbly edges. But since we need to jitter anyways for super resolution, how does this jitter pattern affect the sample grid over time? The first frame will use the standard 4x MSAA pattern.
The second offset in our pattern applies a half pixel offset in x but not y (0.5,0.0). Here is where they land on the grid.
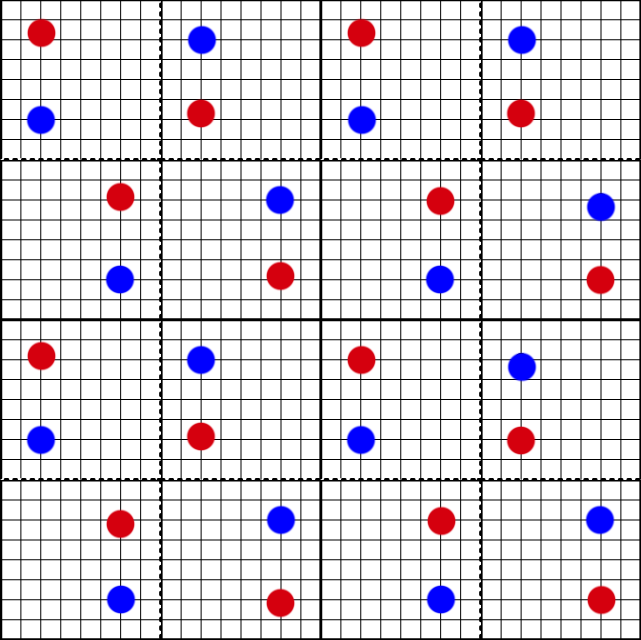
The third offset applies a half pixel offset in y but not x (0.0,0.5).
And the final offset is a half pixel in both x and y.
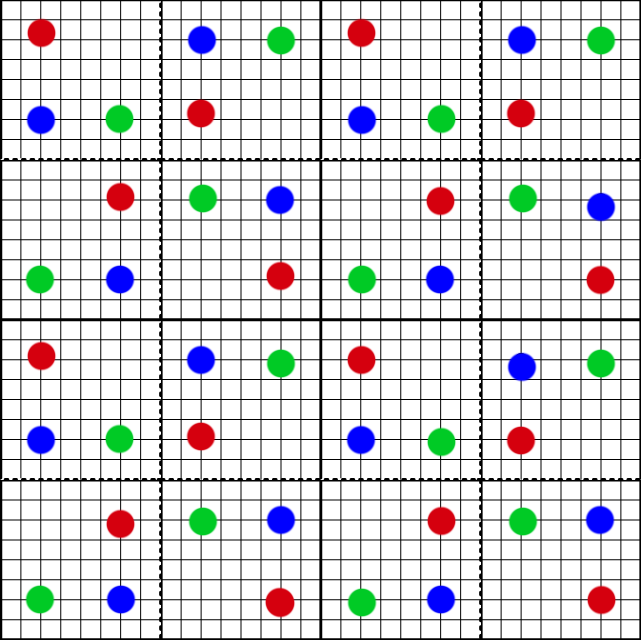
Over the course of 4 frames, we end up accumulating a perfectly even pattern.

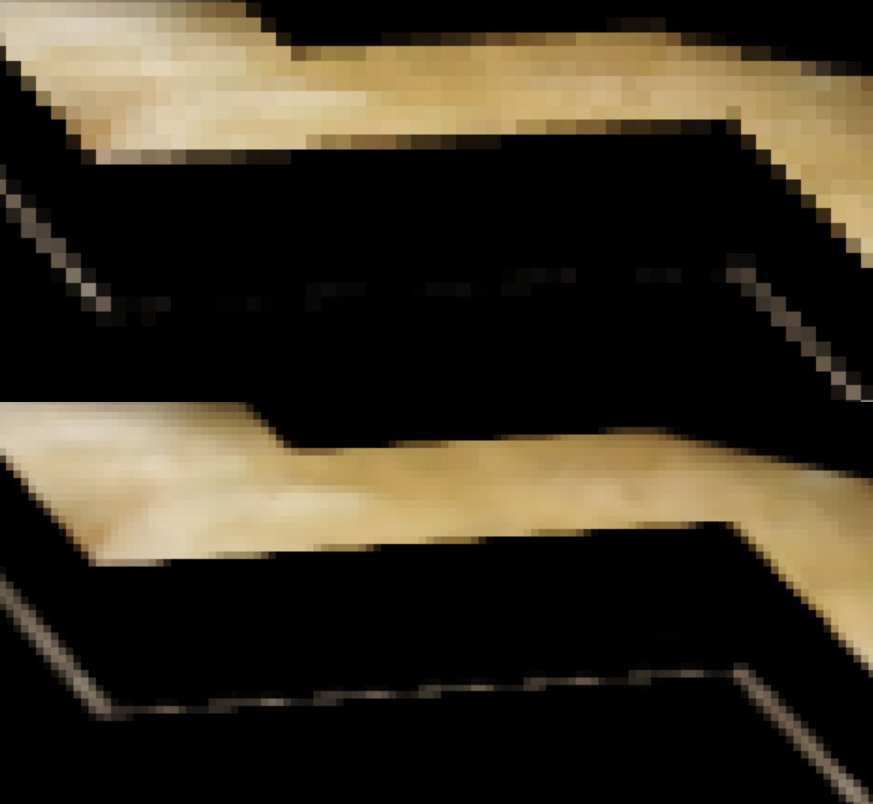
In the image below, the original MSAA image has trouble resolving the diagonal lines. In each of the 4 frames with upsampling, the edges are resolved but they wobble a bit causing sharp angles. However, the four frames evenly balance each other and the diagonal lines are clean in the final temporal image.
Originally, after the spatial upsample test I was wondering if it made sense to apply pattern matching like SMAA [6] to fix the wobbling areas. But temporal anti-aliasing cleans it up. Conveniently, the pattern that gives us good data for 4x super sampling on interior regions also gives us the perfect sample pattern for diagonal edges. I would like to claim that I had some grand plan here, but the truth is that sometimes things just work out.
Applying the Jitter
In the previous post, the 4 output pixel colors were generated from the marked ‘x’ positions below.
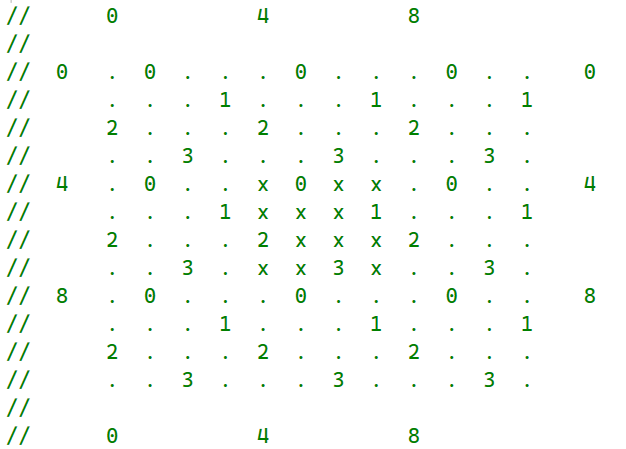
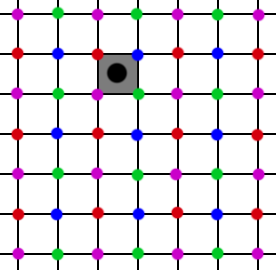
With jitter it becomes slightly more complicated. We can think of the MSAA pattern as 9 different buckets, and depending on our jitter we want a different 2x2 group of buckets.

By performing both a jitter and a separate offset it keeps the actual frame stationary. Over the course of one cycle of the pattern, we end up with 4 separate images.
The next step is to actually accumulate the pattern. Once we render into a 4x MSAA pattern, how should we apply it to our temporal accumulation buffer? To keep it simple, we will store a 4x area accumulation buffer. That means each frame we will render into a 1080p (1920x1080) 4x MSAA buffer, and merge that data into a 4k (3840x2160) accumulation buffer.
Motion vectors are fetched from a 1x, 1080p buffer that gets rendered earlier. Then for each of the 4 buckets, it gathers the previous reprojected color, applies a color clamp, and lerps with the color for the current frame bucket. All 4 buckets use the same motion vector.
For the color clamp we can use all pixels involved in the calculation for that bucket. Each color inside the bucket is determined by evaluating a cross from 4 neighbors and weighing them base on the gradient. Simply expanding the color box to include all 4 neighbors made the most sense. The example code for calculating the color and box bounds for a bucket is below. Also note that instead of using the smallest absolute gradient, the algorithm now weighs both gradients together.
First we have a helper function that given the 4 points in the cross calculates the color and expands the color box.
float3 CalcDiamondAbsDiffColorClamp(
             inout float3 low, inout float3 high,
             float3 left, float3 right, float3 up, float3 down)
{
	float lumL = CalcLuminance(left);
	float lumR = CalcLuminance(right);
	float lumU = CalcLuminance(up);
	float lumD = CalcLuminance(down);

	float eps = 1e-5f;
	float diffH = max(eps,abs(lumL - lumR));
	float diffV = max(eps,abs(lumU - lumD));

	float wh = diffV/(diffH + diffV);
	float wv = 1.0f - wh;

	float3 ret = 0;

	float3 avgH = (left + right) * .5f;
	float3 avgV = (up + down) * .5f;

	ret = avgH*wh + avgV*wv;

	low = min(low,min(left,right));
	high = max(high,max(left,right));

	low = min(low,min(up,down));
	high = max(high,max(up,down));

	return ret;
}
Next, the color box is initialized to the one known sample and expanded as the other points are calculated.
// initialize min and max
float3 min00 = color__4__5;
float3 max00 = color__4__5;

// calculate 4 colors from grid, and expand color box
float3 grid__4__5 = color__4__5;
float3 grid__4__4 = CalcDiamondAbsDiffColorClamp(
           min00,max00,color__4__1,color__4__5,color__2__4,color__6__4);
float3 grid__5__4 = CalcDiamondAbsDiffColorClamp(
           min00,max00,color__5__3,color__5__7,color__2__4,color__6__4);
float3 grid__5__5 = CalcDiamondAbsDiffColorClamp(
           min00,max00,color__5__3,color__5__7,color__4__5,color__8__5);

// calculate final expected pixel for this frame
float3 dst00 = 0.25f*(grid__4__4 + grid__4__5 + grid__5__4 + grid__5__5);
Then the four samples are gathered with the same motion plus a small offset.
// fetch the 4 previous colors to use for our 4 buckets
float3 overlayTex00 = prevTex.SampleLevel(s_samplerLinearClamp,
           uv+motion + float2(-quarterPixelX,-quarterPixelY),0.0f).rgb;
float3 overlayTex01 = prevTex.SampleLevel(s_samplerLinearClamp,
           uv+motion + float2( quarterPixelX,-quarterPixelY),0.0f).rgb;
float3 overlayTex10 = prevTex.SampleLevel(s_samplerLinearClamp,
           uv+motion + float2(-quarterPixelX, quarterPixelY),0.0f).rgb;
float3 overlayTex11 = prevTex.SampleLevel(s_samplerLinearClamp,
           uv+motion + float2( quarterPixelX, quarterPixelY),0.0f).rgb;
We also want slightly different behavior depending on how much motion we have for the pixel. If the camera is stationary we generally want to apply a low influence for the current frame so that the frames average together well. However, if we have significant motion in this pixel (more than half a pixel) then we should rely more on the current pixel and less on the history. While the testing was not rigorous, a 5% blend for stationary motion vectors versus a 25% blend for signficant motion seemed like a good balance.
// 0.1 pixel movement is considered as no movement, 0.5 is full movement
float motionT = saturate((motionLength - 0.1f)/(0.5f-0.1f));

// check for borders
float weight = 1.0f;
if (prevUv.x < invSizeX || prevUv.y < invSizeY ||
    prevUv.x > 1.0 - invSizeX || prevUv.y > 1.0f - invSizeY)
{
	weight = 0.0f;
}

// determina final lerp value
float t = lerp(0.05f,0.25f,motionT)*weight;

// clamp history value with color box
overlayTex00 = clamp(overlayTex00,min00,max00);

// lerp final pixel with history
ret00 = lerp(overlayTex00,dst00,t);
Choosing temporal accumulation parameters is an exercise in endless tweaking. At a glance the image looks pretty sharp in motion and converges quickly when still, but much more testing would be required for a real production.
TAA Comparison 1: Thin Features
One of the common issues that TAA implementations run into is thin features which are less than a pixel wide. Why is this such an issue, and can MSAA help with it? The image below shows a comparison of one of the edges on a pillar in Sponza. The top uses vanilla TAA and the bottom uses the algorithm described in this post.
TAA does a pretty good job here on the surfaces but fails to reconstruct the thin edge. Why?
Here are two consecutive images in the TAA sequence. In each frame, the history is clamped to the min and max of the 3x3 neighborhood in the current frame.
The first frame will put these bright colors into the history buffer. But the following frame will only see black pixels and clamp those bright history pixels into the black neighborhood. Thus, the reconstruction fails.
However we get much better results with temporal super resolution via MSAA. But why? Let’s take a look at the 4 candidate images that are used in the jitter pattern.
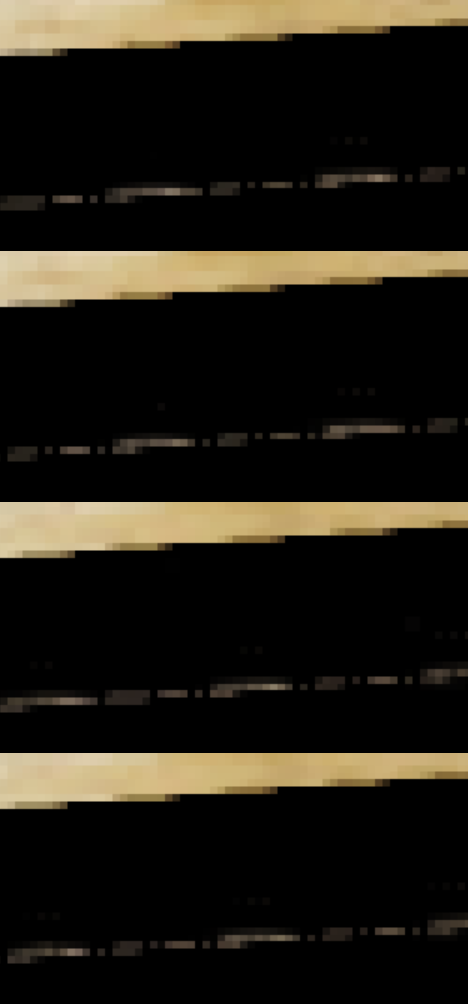
At a glance, the results are not much better than TAA. Each frame has gaps in the pixels. But the color bounding box includes the 4 candidate pixels from the cross. Even if the current cross point gets evaluated poorly, the color clamp is adjusted by the 4 samples that form the cross for that point, and at least one of those samples should have a color that matches the correct value. Those crossing pixels expand the color clamp which allows this algorithm to know that the history pixels are still valid. In other words, the MSAA temporal super resolution algorithm IS NOT better than TAA at choosing the current pixel color, but it IS better at knowing when to trust the history.
TAA Comparison 2: Motion
The second major issue with TAA is motion. In most TAA implementations, the images look great in a still frame but tend to look blurry in motion. Most engines that I have seen use a temporal weighting of about 4% to 5% for their TAA influence. For each pixel, the output uses an algorithm similar to the following:
float lerpT = 0.04f; // or some other number

float3 colorMin = MinColorFromNeighborhood();
float3 colorMax = MaxColorFromNeighborhood();

float3 prevFrameColor = ReprojectedColorUsingMotionVectors();
float3 currColor = ResolvedColor();
float3 clampedColor = clamp(prevFrameColor,colorMin,colorMax);

float3 finalColor = lerp(clampedColor,currColor,lerpT);
There are other tricks you can do, like changing lerpT based on the length of the motion vector, or using a better color space like YCrCb, or use variance for the color clamp.
If you are using a lerpT value of 4%, then it takes about 60 frames for the image to converge if there is no motion. But if you have a scene where everything is always moving a little bit, then TAA never really has time to converge. This can happen with grass blowing in the wind, walking forward slowly, or even games that have a slight up and down camera translation to simulate the character breathing. The type of color clamp and amount of influence for each frame is a complicated trade off of detail vs blurriness in motion vs edge jaggies vs ghosting. Changing the parameters to improve one element tends to cause a regression somewhere else.
However, using MSAA provides several meaningful benefits. With MSAA, we always get a bit of edge anti-aliasing from the current frame (without temporal information) so we can get acceptable edges even in motion. And since we are only using a 4 frame cycle, we can aggressively discard the history with the current frame when in motion.
Here is a test from my TAA implementation vs the MSAA super resolution algorithm discussed here. Note that most TAA implementations in game engines are much more robust and sophisticated, especially in comparison to the super resolution implementations optimized by IHVs. But, you will see similar artifacts in shipping titles, as documented in comparison videos [5][7].
For this test, I put together an automated camera script. The camera simply moves forward for 60 frames, takes a screenshot, then remains still for 60 frames to let the image converge and takes another screenshot.
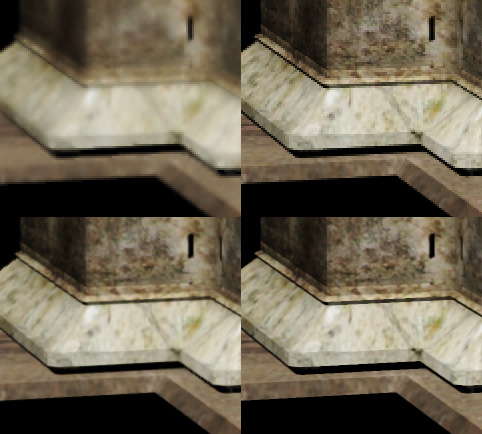
The upper-left image shows the TAA image while in motion. The upper-right shows the TAA image after the camera stays still for 60 frames allowing the image to converge. The bottom-left shows the MSAA super resolution image while undergoing the same motion, and the lower-right shows that image after the camera remains still. If you look closely, the MSAA super resolution image in motion is slightly blurrier than the still image.
Looking at the first row for the TAA image, there is obvious blurring of the image. Additionally, the edges are not converged either which causes crawling jaggy artifacts in motion.
The MSAA super resolution image, while imperfect, looks much improved. The edges of the moving images are slightly softer. We can also see some light “jagged teeth” along the edges too, although since they are quite small and fade quickly they are hard to see in motion. Finally, while the details are slightly blurrier than the converged image, it looks much better than the moving TAA image.
Performance
Of course, adding temporal information is not free. Included are the costs from the previous post, as well as the new entry for 4x with temporal information. Timings are in microseconds on my RTX 3070.
| MSAA Level | Single Frame | Temporal Super Resolution |
|---|---|---|
| 2x | 118 | N/A |
| 4x | 283 | 365 |
| 8x | 731 | N/A |
The cost is higher, but it seems very much worth it. All of these passes have significant room for improvement. So while it’s still too slow, 365 microseconds is good starting point before optimization.
Evaluation
Overall, the quality is better than I had expected. Adding temporal super resolution increases the edge quality around the near 45 degree lines. It “de-blocks” the 2x2 pattern while also increasing resolvable resolution. If you have a 4x MSAA rendered image, temporal super resolution seems like a clear improvement at reasonable cost. But there are also several significant areas to improve.
-
In some cases there are some flickering artifacts. With a repeating 4 pattern cycle, there are cases where one of the pixels causes an outlier which results in little “flickering teeth”. It is subtle, but you can see it if you look closely. It is unclear if the better approach is to apply an explicit “unteething” pass (similar to Rainbow Six Siege [12]) or if the temporal accumulation algorithm should be modified.
-
The algorithm still is not equivalent to supersampling. Each pixel is the average of the 4 neighboring corner sample points. Ideally we would be sampling from pixel centers, as opposed to the average of neighbors. While the super resolution image is able to resolve details that the lower resolution images miss, the result does look a little soft.
-
The biggest problem (and it’s a big one!) is that you need to have an MSAA render target. Games rely on rendering techniques like deferred lighting, SSAO, SSR, etc. They can theoretically be done with MSAA, but in practice it’s a maintenance nightmare full of little performance regressions. As it stands, this technique is only viable if you are already rendering an MSAA target which is a non-starter for most titles.
Example Code
For a reference implementation, here are the functions in a standalone file. It will require some changes as this is a snippet from a larger code base, but hopefully it makes the algorithm easier to understand.
UpsamplingViaMultisampling.hlsl
References
[1] A Survey of Temporal Antialiasing Techniques. Lei Yang, Shiqiu Liu, and Marco Salvi. (http://behindthepixels.io/assets/files/TemporalAA.pdf)
[2] AMD FidelityFX, Super Resolution. AMD Inc. (https://www.amd.com/en/technologies/radeon-software-fidelityfx-super-resolution)
[3] Anti-Aliasing and Upscaling, Epic (https://dev.epicgames.com/documentation/en-us/unreal-engine/anti-aliasing-and-upscaling-in-unreal-engine)
[4] Arm Accuracy Super Resolution, ARM (https://github.com/arm/accuracy-super-resolution)
[5] DLSS 4.0 Super Resolution Stress Test, Digital Foundry (https://www.youtube.com/watch?v=iK4tT9AHIOE)
[6] SMAA: Enhanced Subpixel Morphological Antialiasing, Jorge Jimenez, Jose I. Echevarria, Tiago Sousa, and Diego Gutierrez (https://www.iryoku.com/smaa/downloads/SMAA-Enhanced-Subpixel-Morphological-Antialiasing.pdf)
[7] FSR 4 is Even Better at 4K, Hardware Unboxed (https://www.youtube.com/watch?v=SWTot0wwaEU)
[8] High-Quality Temporal SuperSampling, Brian Karis (https://advances.realtimerendering.com/s2014/#_HIGH-QUALITY_TEMPORAL_SUPERSAMPLING)
[9] Intel Arc Gaming Technologies, Intel (https://www.amd.com/en/products/graphics/technologies/fidelityfx/super-resolution.html)
[10] Introducting Snapdragon Game Super Resolution, Qualcomm (https://www.qualcomm.com/news/onq/2023/04/introducing-snapdragon-game-super-resolution)
[11] NVIDIA DLSS. NVIDIA Inc. (https://www.nvidia.com/en-us/geforce/technologies/dlss/)
[12] Rendering Tom Clancy’s Rainbow Six Siege, Jalal El Mansouri. (https://ubm-twvideo01.s3.amazonaws.com/o1/vault/gdc2016/Presentations/El_Mansouri_Jalal_Rendering_Rainbow_Six.pdf)
[13] Rendering The Alternate History of The Order: 1886, Matt Pettineo, (https://www.youtube.com/watch?v=nj4puag4hwc)