Do you need to automate a huge number of photogrammetry scans? Then I have some good news for you.
Above is a video for Meshroom, an open source photogrammetry program. It is a project that has been around in some form for quite a while, but the big news this week is that they released binaries, so you can just download and run it. The video shows how to use the GUI to load images, process them, change parameters, etc. You should definitely try it out.
But my interest is in full automation. If you have a scanning rig where you are doing 100+ scans per day, then you need a completely automated solution for batch processing these files. This post is a Guide and/or Tutorial on how to do that.
The important thing to understand is that Meshroom is not a giant, monolithic project. Rather, all of the actual processing is done in standalone command-line c++ programs, and Meshroom is a thin python program that makes the appropriate calls. So instead of using Meshroom, we will just call these programs directly. Note that full source is available so you could also link to the libraries directly.
Meshroom has another convenient feature: Every time you run an operation it displays the command in the terminal. So to figure out the steps for this process, I simply ran Meshroom while looking at the commands. Then I also looked at the code to change some parameters as necessary. Also, FWIW you can run tell Meshroom to build an image set from the command line, but I prefer to keep the steps separate.
Prep and Install
0: Requirements Meshroom/AliceVision does not run everywhere. Some of the steps do use CUDA, so you will need an NVIDIA gpu to build the depth maps. Unfortunately, there is no cpu fallback. Otherwise it should work fine on both Windows and Linux. The instructions on this page are for Windows but it should be possible to tweak them for Linux with minimal changes.
1: Download Meshroom Release
The first thing you will have to do is install Meshroom. Choose a directory where you would like to work out of, and then download the latest version. The zip file includes binaries of all dependencies.
If you are feeling a thirst for adventure, you can try to build it yourself. The dynamically linked Release libraries seem to work fine (/MD), but I have had to hack cmake files to build Debug and/or statically linked builds. If you are going to build on Windows, I HIGHLY suggest using VCPKG.
2: Download Data
Obviously, the entire point of photogrammetry software is to process your own images, but as a starting point I would suggest using images that are known to work, which reduces the number of variables to isolate if something goes wrong. Thankfully, they have released the set of images for their test tree.
3: Download the run_alicevision.py script
Here is the script that we will be using. Just download the zip, and unzip it to the working directory.
4: Install Python
https://www.python.org/download/releases/2.7/
If you do not already have it, install python. Yes, I still write code for python 2.7.0. The easiest method is to install the Windows X86-64 MSI Installer from the releases.
5: Install Meshlab (Optional)
As an optional step, you should also install MeshLab. You will not actually need it for processing, but several steps along the way output PLY point files. These do not load in Maya, so I use MeshLab to view them.
When all the files are unzipped, your folder should look like this (except for build_files, which is generated by the scripts):
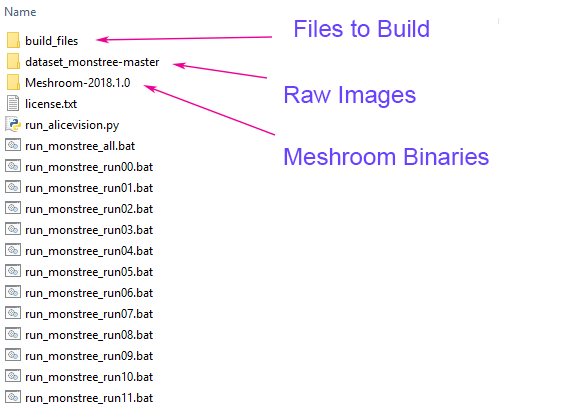
Those files are:
- build_files: These are the files we will build.
- dataset_monstree-master: The source images
- Meshroom-2018.1.0: Meshroom/AliceVision binaries.
- Everything else: The scripts to run it, which come from run_alicevision.zip.
Running AliceVision
Now would be a good time to take a look at run_alicevision.py
The python file takes 5 arguments: python run_alicevision.py <baseDir> <imgDir> <binDir> <numImages> <runStep>
- baseDir: The directory where you want to put intermediary files.
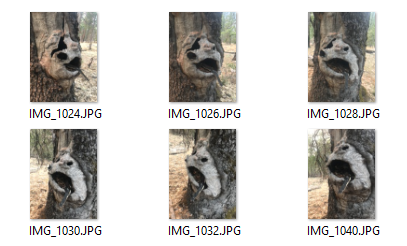
- imgDir: The directory containing your source images. In our case, IMG_1024.JPG (among others).
- binDir: The directory containing the AliceVision executable files, such as aliceVision_cameraInit.exe.
- numImages: The number of images in imgDir, in this case 6. Note that would could detect this automatically, but the goal was to keep the python script as simple as possible so you have to specify it manually.
- runStep: The operation to run.
In summary, we will start with 6 images that look like this:
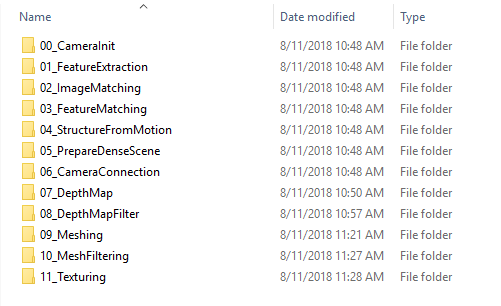
With the run_alicevision.py python script, we are going to create this directory structure:
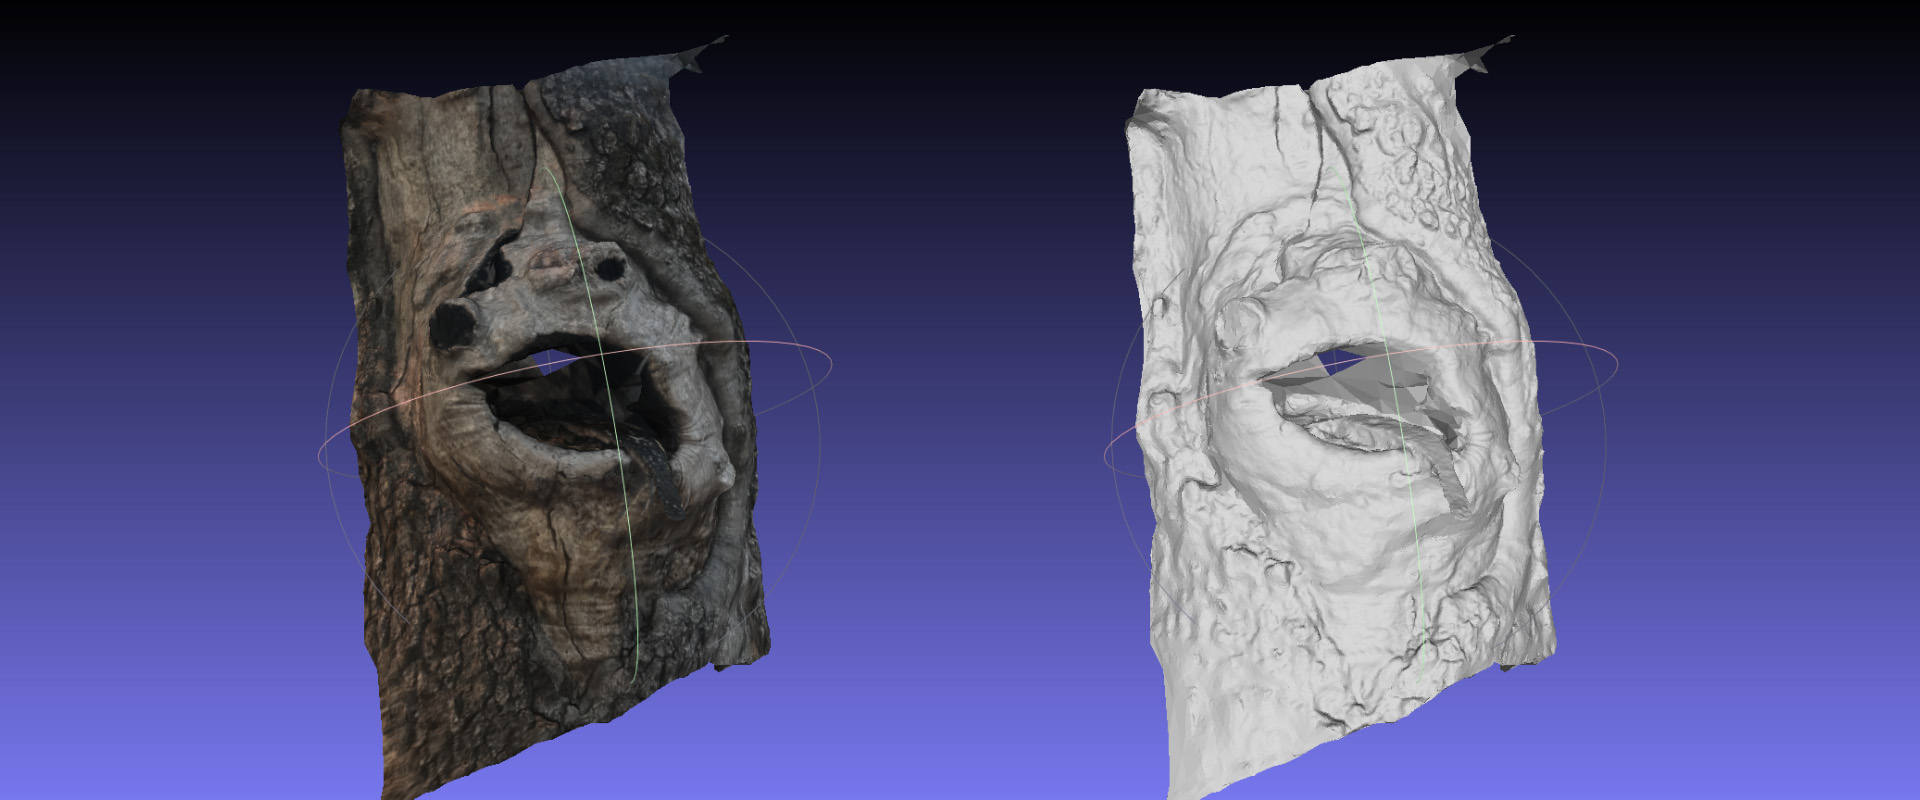
And the 11_Texturing directory will have the final model that opens up in Meshlab:

Each of those directories is one of the steps. We can either run those one at a time using the run_monstree_runXX.bat files, or we can use run_monstree_all.bat to build them all.
That is it. You can now either run the run_monstree_all.bat file, or do it one step at a time. You should be able to look at the script and figure it out. For those of you who want to customize the pipeline, here is an introduction on the individual steps.
00_CameraInit
The first step will generate an SFM file. SFM files are json files that store camera size, sensor information, found 3d points (observations), distortion coeffecients, and other information. The initial SFM file in this directory will just contain the sensor information, and it will choose defaults from a local sensor database. Later steps will create SFM files that contain full camera extrinsic matrices, bundle points, etc.
This is a step you might want to customize. If you have a rig with 4 cameras, but you take 10 shots as an object rotates on a turntable, you will want an SFM file with 40 images, but only 4 different sensor calibrations. This is a major reason why I like AliceVision’s structure. It is easy to customize the batch operations (such as generating a custom SFM file) without having to dig into the other software pieces that you would rather not touch.
01_FeatureExtraction
The next step extracts features from the images, as well as descriptors for those features. It will change the file extension based on what type of feature you are extracting.
02_ImageMatching
02_ImageMatching is a preprocessing step which figures out which images make sense to match to each other. If you have a set of 1000 images, a brute force check of all 1000 images against all 1000 images would take 1 million pairs. That might take a while (actually, half that many but you get the idea). The 02_ImageMatching step culls those pairs
03_FeatureMatching
03_FeatureMatching finds the corresponces between the images, using feature descriptors. The generated txt files are self-explanatory.
04_StructureFromMotion
Ok, here is the first big step. Based on the correspondences, 04_StructureFromMotion solves the camera positions as well as camera intrinsics. Note that “Structure From Motion” is used as the generic term for solving camera positions. If you have a 10 camera synced photogrammetry setup, “Structure From Motion” is used to align them, even if nothing is actually moving.
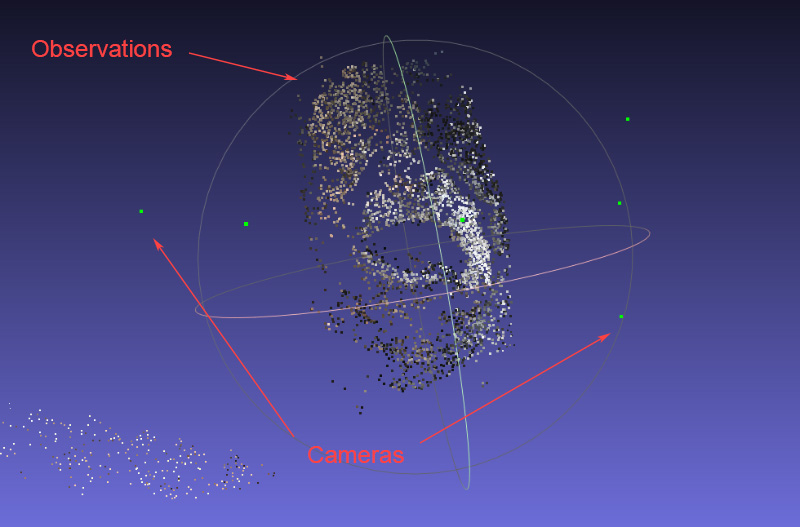
By default Meshroom stores the solved data as an Alembic file, but I prefer to keep it as an SFM file. This step generates intermediary data so that you can verify that the cameras aligned properly. The script outputs PLY files which you can look at in Meshlab. The important files are:
- bundle.sfm: SFM file with all observations.
- cameras.fm: SFM file with only the aligned cameras.
- cloud_and_poses.ply: Found points and cameras.
Here is cloud_and_poses.ply. The green dots are the cameras. I find this view is the easiest way to verify that nothing went horribly wrong with the camera alignment. If something does go wrong, you can go back and change the features, matches, or SFM parameters.
05_PrepareDenseScene
05_PrepareDenseScene’s primary function is to undistort the images. It generates undistorted EXR images so that the following depth calculation and projection steps do not have to convert back and forth from the distortion function. The images look like this:
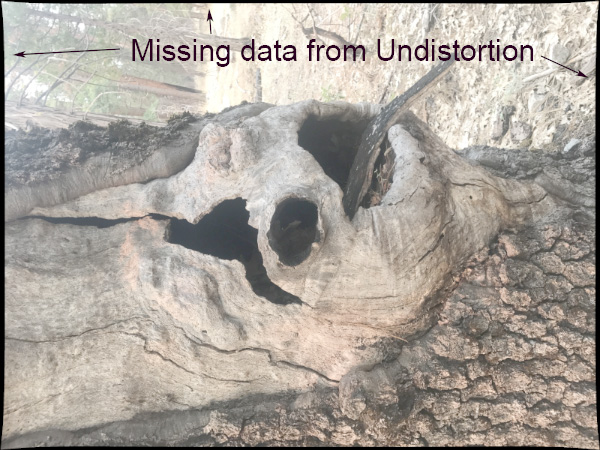
Note that you will see black areas. The later AliceVision steps will not use the camera’s actual matrix. Rather, we will pretend that the camera has a new matrix without distortion, and 05_PrepareDenseScene warps the original image to this fictional matrix. Since this new virtual sensor is larger than the actual sensor, some areas will be missing (black).
06_CameraConnection
Technically, this step breaks our workflow. These steps were designed such that each folder was a completely unique standalone step. However, 06_CameraConnection creates the camsPairsMatrixFromSeeds.bin file in 05_PrepareDenseScene because that file needs to be in the same directory as the undistorted images.
07_DepthMap
Here is the longest step of AliceVision: Generate depth maps. It creates a depth map for each image as an EXR file. I tweaked it to be easier to see. You can see the little “tongue” of the tree.
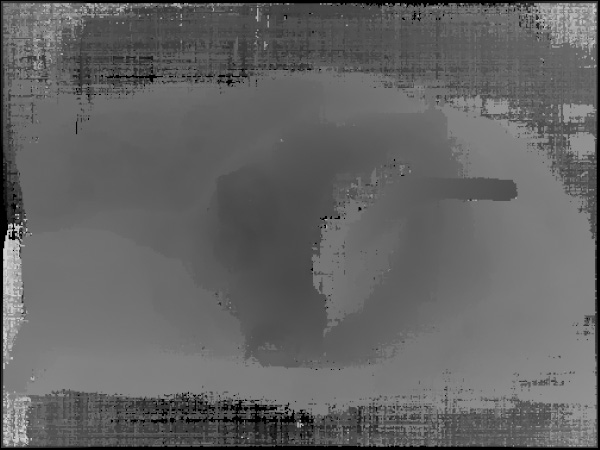
Since this step can take a long time, there is a parameter to allow you to run groups of different cameras as different standalone commands. So if you have 1000 cameras, you could depth process groups of cameras with different machines on a farm. Alternatively, running in smaller groups can be useful so that if one machine crashes, you do not have to rerun the whole process.
08_DepthMapFilter
The original depth maps will not be entirely consistent. Certain depth maps will claim to see areas that are occluded by other depth maps. The 08_DepthMapFilter step isolates these areas and forces depth consistency.

09_Meshing
This is the first step which actually generates the mesh. There might be some problems with the mesh which can be solved with…
10_MeshFiltering
The 10_MeshFiltering step takes the 09_Meshing mesh and applies some refinements. It performs actions such as:
- Smoothing the mesh.
- Removing large triangles.
- Keeping the largest mesh but removing all the others.
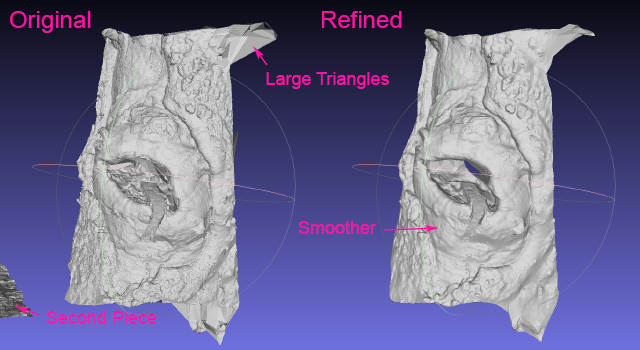
Some of these operations are not necessarily desirable for certain applications, so you can tweak those parameters as necessary.
11_Texturing
And the final step. 11_Texturing creates UVs and projects the textures. And with that step we are done!
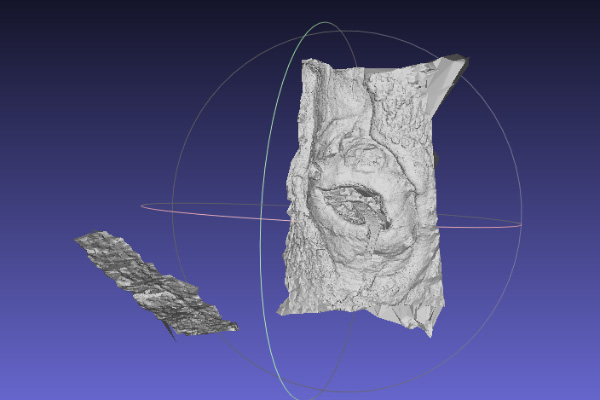
One final trick with Meshlab is that you can drag and drop different OBJ and PLY files as layers.

So in this case I have a layer for both the final mesh and the SFM points/cameras. Sometimes the mesh smoothing step can be a little too agressive so I find it useful to compare between the original mesh and the smooth mesh. If the mesh looks broken, the PLY sfm data and the OBJ meshes are great for tracing through the pipeline.
Acknowledgements
This post would not be complete without a big thanks to the AliceVision and OpenMVG teams. The original inspiration was actually the libmv project. That project was a precursor for OpenMVG, which is a repository for computer vision engineers/researchers to develop new algorithms. AliceVision is a fork of OpenMVG with the explicit goal of turning those algorithms into a standalone, production-ready solution.
AliceVision/Meshroom is a large, ambitious open-source project. It is a major accomplishment to get a project this big over the finish line and we owe them a debt of thanks. We also owe thanks to the OpenMVG team (and libmv) which perfomed the foundational work that allowed AliceVision to exist.
Finally, I have to give a special thanks to Microsoft for VCPKG. VCPKG is a package manager that has made it vastly easier to build large open source projects on Windows. Several years ago I tried to build OpenMVG on Windows. It did not go well. So when I heard about AliceVision a few months ago I tried to compile it, but was failing miserably with even simple things. See: Boost. Then I tried VCPKG, and it all worked the first time. It is hard to quanitify the benefit of something like VCPKG, but it is a great help to the open-source ecosystem on Windows.